GoPro Camera and DIY Mounts
For my birthday several months ago, Karrie got me this new GoPro camera. I had been looking at getting one for a while now. It's called the GoPro Hero and the great thing is that it's light, small durable and shoots HD video. It also takes pictures and time lapse sequences but mainly it is used for shooting HD action videos where a bigger camera just won't work. There are several different video modes like 1080P, 720P and 60 fps (frames per second). The 60 fps is what i've found to be my favorite. When i play it back on the computer, the video looks the best out of all the settings. And if i ever want to create slow motion, i can always reduce the speed in half and still have a typical 30 fps.
The camera comes in a shockproof and waterproof case. Which means that it can go under water and places where a normal camera might get broken. It's lightweight design also means that you can attach it to things like helmets and you aren't too weighted down with equipment.
The GoPro cameras are used by everyone from amateurs to network television shows. You can also see that the lens is curved which gives it a 160 degree viewing angle. It's great because you can be very close to something and still get everything in the picture. Although there is no screen so you aren't 100% sure if they are in the shot or not. You can buy a detachable monitor but it's expensive and not really necessary. Plus it doesn't fit inside the clear plastic case.
But you'll see on tv that the cameras get mounted on helmets for snow boarding, sky diving and mountain biking. I've seen them mounted on the outside of cars during races, surfboards and anything and everything. I plan on using it this year while skiing, tubing and behind Katie and John's new boat. Also i want to mount it on the motorcycle, bike helmet and even take it underwater.
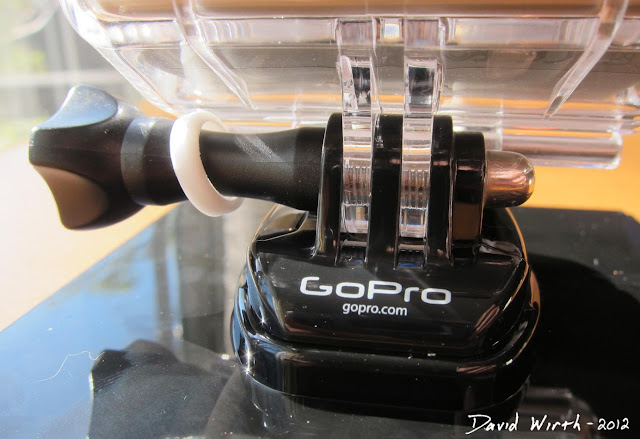
Here's how the camera attaches to the base. The base and clear case are a heavy duty plastic / polycarbonate.
This is the helmet mount, on the bottom is permanent 3M tape and it's curved to contour better to round helmets. The bad part about this is that once the mount is attached it's permanent. Not only is it permanently attached to whatever you stuck it to, but that also means that you can't attach it to anything else. So i'm a little afraid to use it, but i plan on sticking it to an old bike helmet.
The GoPro Hero kit only came with those two brackets, so i decided to make some more custom ones. I though a long while on how i could make something which would be strong and lightweight. I didn't want the mount to break and have the camera sink to the bottom of a lake.
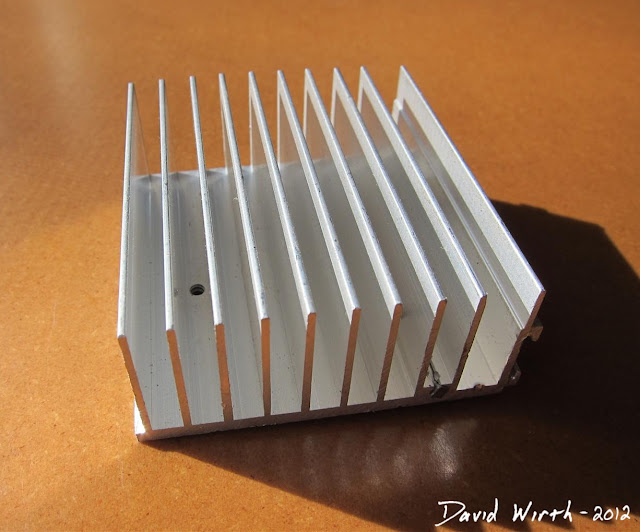
Then one day i saw an old aluminum heat-sink lying around on my workbench. I though that it wold be perfect. I actually had a few from old computers and broken electronics. This one was the right size and had close enough width in its fin spacing.
So after some cutting, gluing and lots and lots of metal filing i ended up with these. I made two, one for each type of mounting direction. That way i could minimize the wobble. I was planning to attach one to a bike helmet and one to the handle bars.
You can kind of see that on two of the fins i had to use copper washers. The thin washers were needed to create a tight fit with the GoPro polycarbonate case. I used JB Weld to glue the aluminum heat-sink to the base plate.
Also you can see the pencil marks on the base for cut-outs. After i took this picture i went back downstairs and drilled out those openings. That way i could attach them with straps or rivets.
This was another mount that i decided to try and make. It's a chest mount, that with the help of 4 straps, would go on the front chest of someone.
The last thing i decided to make was a hand-held mount. Just something simple that i could use to easily hold the GoPro camera around. Since it didn't come with any type of handle, i usually just leave this permanently attached to the case.
I bought a thumb screw bolt to attach it to the camera. That way i could remove it without any tools. Also i drilled a hole in the bolt to attach a rope wrist strap. That way if the glue or the heat-sink fins broke i would still have the camera attached to my wrist. If i had attached the strap to the handle and the glue broke the camera would still fall.
Here's the other side of the mount. I also JB Welded a nut to the back side so that it was always in place.
This was actually what i used when i went to Gatlinburg Tennessee for New Years. It was perfect for video taping the chair lift ride and even better when we went go-cart racing.
Originally i wanted to make a steadicam mount so that there wouldn't be lots of camera shake. But that would have made it much bigger with a heavy weight at the bottom. The video from the go-cart racing didn't turn out super smooth. There was lots of vibration and i had to record with one hand and drive with the other. I still haven't finished processing the video from New Years, but when i do i'll post a link to the video here. And i still plan on making a steadicam mount but it has to be small and durable.
EDIT:
Here's the link to the youtube video i shot with the GoPro Hero
Go Cart Racing in Gatlinburg Tennessee
The camera comes in a shockproof and waterproof case. Which means that it can go under water and places where a normal camera might get broken. It's lightweight design also means that you can attach it to things like helmets and you aren't too weighted down with equipment.
The GoPro cameras are used by everyone from amateurs to network television shows. You can also see that the lens is curved which gives it a 160 degree viewing angle. It's great because you can be very close to something and still get everything in the picture. Although there is no screen so you aren't 100% sure if they are in the shot or not. You can buy a detachable monitor but it's expensive and not really necessary. Plus it doesn't fit inside the clear plastic case.
But you'll see on tv that the cameras get mounted on helmets for snow boarding, sky diving and mountain biking. I've seen them mounted on the outside of cars during races, surfboards and anything and everything. I plan on using it this year while skiing, tubing and behind Katie and John's new boat. Also i want to mount it on the motorcycle, bike helmet and even take it underwater.
Here's how the camera attaches to the base. The base and clear case are a heavy duty plastic / polycarbonate.
This is the helmet mount, on the bottom is permanent 3M tape and it's curved to contour better to round helmets. The bad part about this is that once the mount is attached it's permanent. Not only is it permanently attached to whatever you stuck it to, but that also means that you can't attach it to anything else. So i'm a little afraid to use it, but i plan on sticking it to an old bike helmet.
The GoPro Hero kit only came with those two brackets, so i decided to make some more custom ones. I though a long while on how i could make something which would be strong and lightweight. I didn't want the mount to break and have the camera sink to the bottom of a lake.
Then one day i saw an old aluminum heat-sink lying around on my workbench. I though that it wold be perfect. I actually had a few from old computers and broken electronics. This one was the right size and had close enough width in its fin spacing.
So after some cutting, gluing and lots and lots of metal filing i ended up with these. I made two, one for each type of mounting direction. That way i could minimize the wobble. I was planning to attach one to a bike helmet and one to the handle bars.
You can kind of see that on two of the fins i had to use copper washers. The thin washers were needed to create a tight fit with the GoPro polycarbonate case. I used JB Weld to glue the aluminum heat-sink to the base plate.
Also you can see the pencil marks on the base for cut-outs. After i took this picture i went back downstairs and drilled out those openings. That way i could attach them with straps or rivets.
This was another mount that i decided to try and make. It's a chest mount, that with the help of 4 straps, would go on the front chest of someone.
I bought a thumb screw bolt to attach it to the camera. That way i could remove it without any tools. Also i drilled a hole in the bolt to attach a rope wrist strap. That way if the glue or the heat-sink fins broke i would still have the camera attached to my wrist. If i had attached the strap to the handle and the glue broke the camera would still fall.
Here's the other side of the mount. I also JB Welded a nut to the back side so that it was always in place.
This was actually what i used when i went to Gatlinburg Tennessee for New Years. It was perfect for video taping the chair lift ride and even better when we went go-cart racing.
Originally i wanted to make a steadicam mount so that there wouldn't be lots of camera shake. But that would have made it much bigger with a heavy weight at the bottom. The video from the go-cart racing didn't turn out super smooth. There was lots of vibration and i had to record with one hand and drive with the other. I still haven't finished processing the video from New Years, but when i do i'll post a link to the video here. And i still plan on making a steadicam mount but it has to be small and durable.
EDIT:
Here's the link to the youtube video i shot with the GoPro Hero
Go Cart Racing in Gatlinburg Tennessee


.JPG)


.JPG)

No comments:
Post a Comment