How to Build a Shelf for the Garage
Winter is coming.
Which means that it's time to clean out the garage, or else it will never get done. Actually i wanted to make room so that Karrie could park her car in there and not be covered in snow. A few months ago it was completely packed full of stuff. Since then i've given away my old broken Snapper riding lawn mowers and a bunch of other junk. I also moved some boxes to the basement, cleaning that mess is definitely a job to be done this winter. But for the rest of the stuff, i decided that a big wood shelf was needed to store it all.
Now i could have just bought plastic shelves at Meijer or Lowe's but they are expensive and wouldn't provide as much space. I have a couple of really nice heavy-duty plastic shelves in the basement. They are great for small stuff but the wood shelves i planned on building would be stronger, larger and cost a lot less.
A few weeks ago i made a tool rack for all the garden tools and hung that on the wall in the garage. So far it's been great. The big PVC pipes are easy to use and strong.
Seeing how well this tool rack worked out gave me an incentive to get the rest of the stuff in the garage cleaned up.
My plan was to build four 8 foot shelves made of pine 2x4's and OSB (oriented strand board - sometimes called particle board). 8 foot just makes sense because there will be less cutting since they all come in 8 foot sections. I decided to use 2x4's because they are cheap. And decided on OSB because it's relatively cheap but really strong. They make OSB in 7/8" and 1/2", they were only a few dollars different in price so i went with the 1/2" thickness.
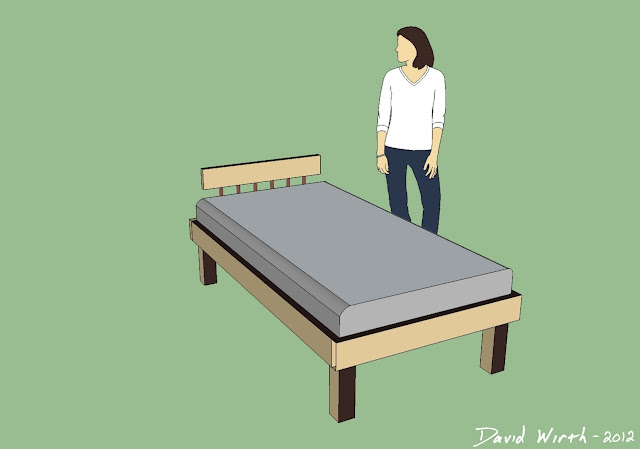
I first drew up the design on paper but then i decided to get more detailed and use Google SketchUp. I've used Google SketchUp before to draw the two twin beds.
SketchUp is great for several reasons. It's free. It's easy to understand, which means it doesn't take hours trying to learn how to draw, though it does help if you spend 8 hours a day using AutoCAD. It's just a really nice program that lets you draw 3D object very quickly. And there's tons of Youtube video's that you can watch and learn different tricks.
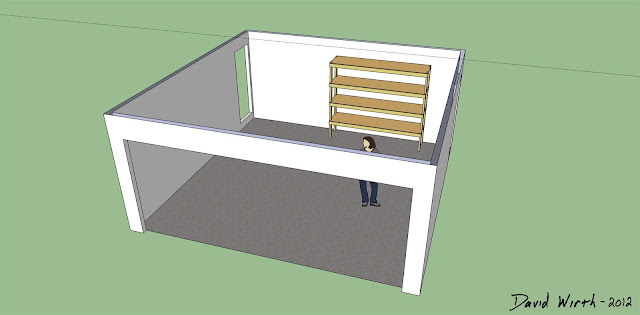
I not only wanted to get the shelf right, but i wanted to make sure that it fit in the garage. So i measured my garage interior dimension and then drew it up. I added the two side doors and the big front garage door. Then i drew the shelf itself and tried different orientations. The first picture at the top is what i came up with after lots of fiddling around. But here's the dimensions for the final shelf design. This was probably version 6, and the third time i redrew it.
If you want to download the actual Google SketchUp files, which are .SKP and .SKP, i uploaded them to my Google Drive. You can download them from these two links:
I actually got a bit carried away with what i could do. Here's an early version where i though about covering all the walls in the garage with shelves. This was also when i thought that i should attach the 2x4's to the floor and ceiling.
But this is why Google SketchUp is great, it lets you zoom in and actually see what it will look like when you are done. It gives you any perspective view from any angle. That is when you realize things like, will the door shut, how tall will it look, do i need 4 shelves or only 3.
Now having said all that, the funny thing is that i didn't check was whether or not a car would fit. It turned out to be ... not really. If i pushed the shelf all the way over to the right a car could maybe fit, but there wasn't enough room to open the driver side door.
So even though this was my final designed drawings, the final location for the shelf was for it to be flat against the on the right.
Material List:
Description Height Width Length Quantity Price Total
2x4 2" 4" 8ft 15 $2.50 $37.50
OSB 1/2" 4ft 8ft 2 $13.00 $26.00
Also i ended up using around 200 - 2.5" deck/drywall screws, which cost around $4.
The total cost with tax was just under $70 which seemed like a lot at first. But then you figure that a cheap plastic 4 foot high shelf cost around $40.
Here's all the wood i bought. Actually i only needed 14 - 2x4's but i got one extra, just in case.
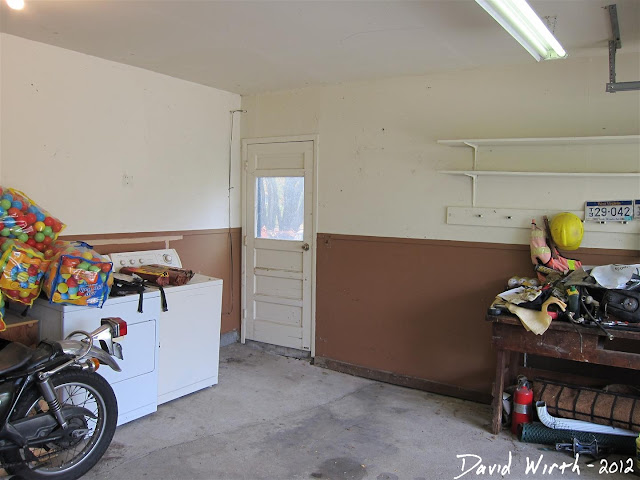
This is what the garage looked like before i started. I made a 360 degree panorama of garage, combining around 18 pictures to make this one.
The first thing i did was to clear the area where the shelf was to go.
And right away i ran into a problem. Measuring from the back wall to the old wall hanging shelves i got 7.5 feet. Which meant that i would have to cut at least 6" off. So i cleared everything off the shelves, unscrewed them from the metal brackets and cut off 10", just to be sure.
While cutting the shelves i decided to also lower the bottom shelf for more room. There used to be a board with weird hooks which in the way. I never used it, so i just took it off the wall. Before the bottom shelf was only 8" from the shelf above it. By taking off the board with hooks i was able to drop the metal brackets all the way down. You can compare this picture with the one a couple above and see the difference.
Moving all of the junk, putting everything back, cutting the old shelf and all that was a lot of work, but when i was done it looked the same as when i started.
The next day i cut the short end boards and started to lay out the shelves. These would be the vertical end pieces.
After taking this picture i realized that i had the screws flipped backwards. It might not seem like a big deal but if i left it like this then the screws which connect the side boards would hit each other. So i had to remove these screws and flip them horizontally. You will see what i mean later when i attach the front and back 2x4's.
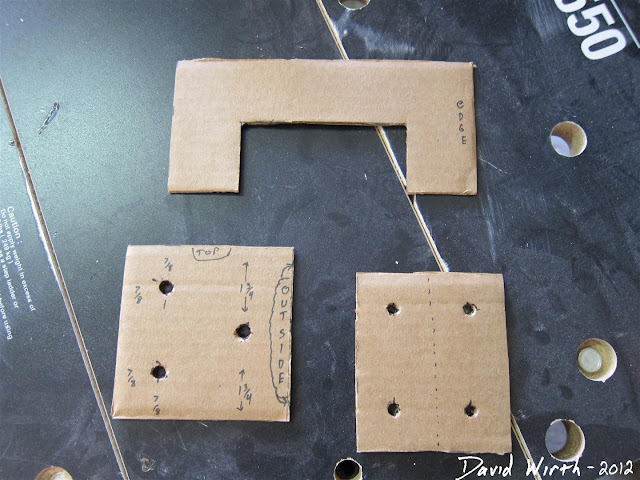
That's when i decided to make a pattern for each of the different screw layouts. It was a great idea that saved me tons of time in the end. The top pattern is for the shelf boards i would cut out later. The left pattern is what i needed for the boards above. The right pattern is for the front and back facer boards
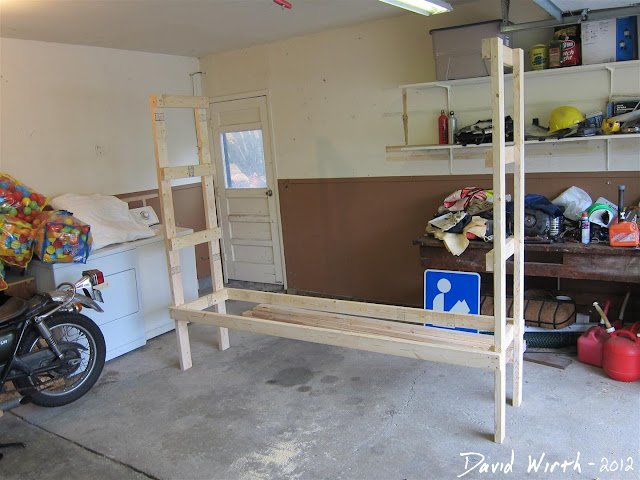
With the end pieces all screwed together i set them in place just to see how it would look and see if it all made sense.
Then i screwed in the first front and back shelf boards and stood everything up.
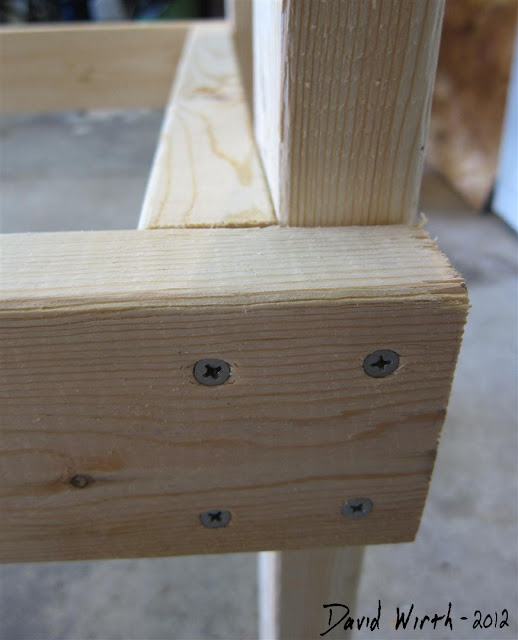
Here's the way i connected all the boards together. Had i not changed the screws earlier, all 4 or these screws might have hit them.
The interlocking way in which the 2x4's all fit together was a design i decided on with some help from John. When Karrie and i went to Katie and John's cottage, he drew this out on the computer.
This was my original idea. It seemed simple, but isn't as strong, since there aren't as many faces touching and screws holding it together. The final version is more compact and everything interlocks with each other.
Next, using a jig saw, i cut out the U-shaped notches using the cardboard pattern from earlier.
Here's a closer look of how the OSB shelf fits into the 2x4 support posts.
Looking at this picture you might think i forgot a few steps, but actually i didn't. Putting the OSB shelves in before attaching the 2x4's was necessary. If i didn't do that first then i would have never been able to get the shelves in.
That's because i had to actually pull the 2x4 uprights apart to be able to slide the shelf boards in and if i screwed the 2x4's in then i wouldn't have been able to pull them apart. Luckily i realized that before attaching all the 2x4 cross beams.
But after cutting all the shelves and fitting them in place i was then able to screw the 2x4 front and back supports together. To make sure it was all square i screwed them in with the shelf on it's side. By this time it was getting pretty big and heavy so i had to get karrie's help to put the shelf down and stand it back up.
But i was able to push it into place by myself and take a look at it. I knew from the start that i was going to have an issue with the shelf not being level because the concrete slab in the garage is much higher near the back wall. You can see the crack in the slab underneath the shelf.
I thought about all the different ways i was going to make sure it was level. I though about making the front legs longer or maybe trimming the back legs. But i decided that the best idea was to just make the shelf square and level and then deal with the uneven floor afterwords. It was off quite a bit.
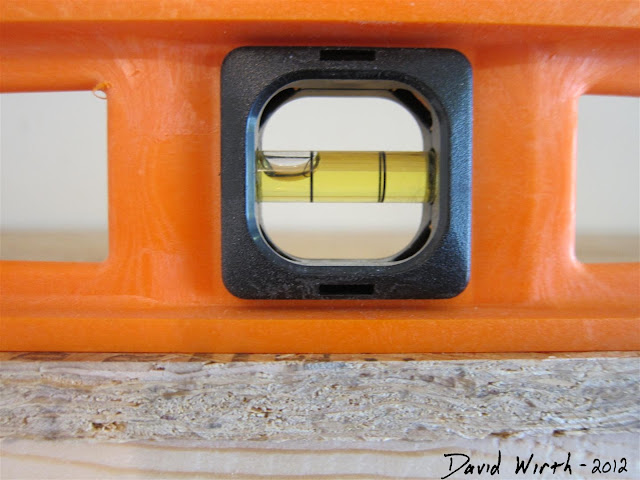
So i lifted up the shelf on the right side and, after trying a series of different thickness boards, found out that using two 2x4's would make the shelf almost perfect.
Close enough for me.
I pushed the shelf back into the corner as much as i could and did a few things to make sure it wouldn't move. I screwed the floor 2x4's together and attached the upright to them with just one screw
Then, so that the shelf didn't tip over, i screwed it to the wall in a few places.
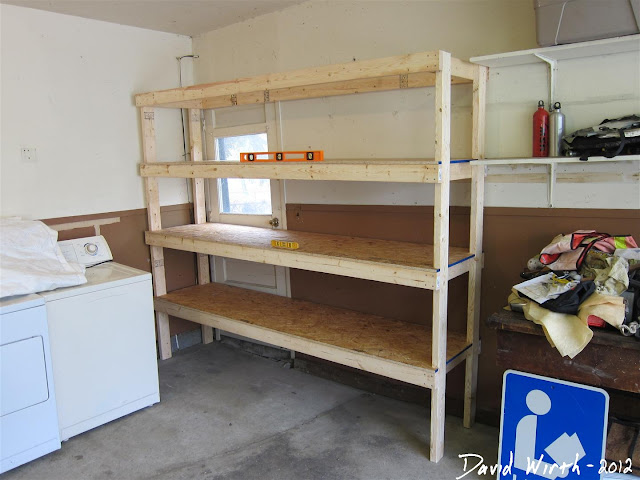
Here's the finished shelf in place, level and secured to the wall.
I actually got really lucky. The second shelf cleared the handle of the old door by a couple of millimeters. I totally didn't think about the door handle until i went to push it in place. If it didn't fit i guess i would have had to trim a few inches off the legs.
Then it was time to start loading up the shelves. Hopefully it will have enough room for everything. otherwise i'll have to build another one.
I took a break, then came back a few hours later to start hanging stuff on the wall. I used those rubber coated hooks and screwed them into the studs behind the drywall. I admit that i got a little crazy hanging the wood bench i made for Karrie on the ceiling, but it did save a lot of room.
EDIT: UPDATE
Here's a summary video of the storage shelf being built.
And here is a link to another storage shelf for the basement.
EDIT:
New Step-By-Step video of the storage shelf being built
EDIT: PDF Templates
Some very nice anonymous person in the comments made a PDF of the the template. Here's a link to it Shelf PDF Templates
Which means that it's time to clean out the garage, or else it will never get done. Actually i wanted to make room so that Karrie could park her car in there and not be covered in snow. A few months ago it was completely packed full of stuff. Since then i've given away my old broken Snapper riding lawn mowers and a bunch of other junk. I also moved some boxes to the basement, cleaning that mess is definitely a job to be done this winter. But for the rest of the stuff, i decided that a big wood shelf was needed to store it all.
Now i could have just bought plastic shelves at Meijer or Lowe's but they are expensive and wouldn't provide as much space. I have a couple of really nice heavy-duty plastic shelves in the basement. They are great for small stuff but the wood shelves i planned on building would be stronger, larger and cost a lot less.
A few weeks ago i made a tool rack for all the garden tools and hung that on the wall in the garage. So far it's been great. The big PVC pipes are easy to use and strong.
Seeing how well this tool rack worked out gave me an incentive to get the rest of the stuff in the garage cleaned up.
My plan was to build four 8 foot shelves made of pine 2x4's and OSB (oriented strand board - sometimes called particle board). 8 foot just makes sense because there will be less cutting since they all come in 8 foot sections. I decided to use 2x4's because they are cheap. And decided on OSB because it's relatively cheap but really strong. They make OSB in 7/8" and 1/2", they were only a few dollars different in price so i went with the 1/2" thickness.
I first drew up the design on paper but then i decided to get more detailed and use Google SketchUp. I've used Google SketchUp before to draw the two twin beds.
SketchUp is great for several reasons. It's free. It's easy to understand, which means it doesn't take hours trying to learn how to draw, though it does help if you spend 8 hours a day using AutoCAD. It's just a really nice program that lets you draw 3D object very quickly. And there's tons of Youtube video's that you can watch and learn different tricks.
I not only wanted to get the shelf right, but i wanted to make sure that it fit in the garage. So i measured my garage interior dimension and then drew it up. I added the two side doors and the big front garage door. Then i drew the shelf itself and tried different orientations. The first picture at the top is what i came up with after lots of fiddling around. But here's the dimensions for the final shelf design. This was probably version 6, and the third time i redrew it.
If you want to download the actual Google SketchUp files, which are .SKP and .SKP, i uploaded them to my Google Drive. You can download them from these two links:
I actually got a bit carried away with what i could do. Here's an early version where i though about covering all the walls in the garage with shelves. This was also when i thought that i should attach the 2x4's to the floor and ceiling.
But this is why Google SketchUp is great, it lets you zoom in and actually see what it will look like when you are done. It gives you any perspective view from any angle. That is when you realize things like, will the door shut, how tall will it look, do i need 4 shelves or only 3.
Now having said all that, the funny thing is that i didn't check was whether or not a car would fit. It turned out to be ... not really. If i pushed the shelf all the way over to the right a car could maybe fit, but there wasn't enough room to open the driver side door.
So even though this was my final designed drawings, the final location for the shelf was for it to be flat against the on the right.
Material List:
Description Height Width Length Quantity Price Total
2x4 2" 4" 8ft 15 $2.50 $37.50
OSB 1/2" 4ft 8ft 2 $13.00 $26.00
Also i ended up using around 200 - 2.5" deck/drywall screws, which cost around $4.
The total cost with tax was just under $70 which seemed like a lot at first. But then you figure that a cheap plastic 4 foot high shelf cost around $40.
Here's all the wood i bought. Actually i only needed 14 - 2x4's but i got one extra, just in case.
This is what the garage looked like before i started. I made a 360 degree panorama of garage, combining around 18 pictures to make this one.
(click to enlarge)
The first thing i did was to clear the area where the shelf was to go.
And right away i ran into a problem. Measuring from the back wall to the old wall hanging shelves i got 7.5 feet. Which meant that i would have to cut at least 6" off. So i cleared everything off the shelves, unscrewed them from the metal brackets and cut off 10", just to be sure.
While cutting the shelves i decided to also lower the bottom shelf for more room. There used to be a board with weird hooks which in the way. I never used it, so i just took it off the wall. Before the bottom shelf was only 8" from the shelf above it. By taking off the board with hooks i was able to drop the metal brackets all the way down. You can compare this picture with the one a couple above and see the difference.
Moving all of the junk, putting everything back, cutting the old shelf and all that was a lot of work, but when i was done it looked the same as when i started.
The next day i cut the short end boards and started to lay out the shelves. These would be the vertical end pieces.
After taking this picture i realized that i had the screws flipped backwards. It might not seem like a big deal but if i left it like this then the screws which connect the side boards would hit each other. So i had to remove these screws and flip them horizontally. You will see what i mean later when i attach the front and back 2x4's.
That's when i decided to make a pattern for each of the different screw layouts. It was a great idea that saved me tons of time in the end. The top pattern is for the shelf boards i would cut out later. The left pattern is what i needed for the boards above. The right pattern is for the front and back facer boards
With the end pieces all screwed together i set them in place just to see how it would look and see if it all made sense.
Then i screwed in the first front and back shelf boards and stood everything up.
Here's the way i connected all the boards together. Had i not changed the screws earlier, all 4 or these screws might have hit them.
The interlocking way in which the 2x4's all fit together was a design i decided on with some help from John. When Karrie and i went to Katie and John's cottage, he drew this out on the computer.
This was my original idea. It seemed simple, but isn't as strong, since there aren't as many faces touching and screws holding it together. The final version is more compact and everything interlocks with each other.
Next, using a jig saw, i cut out the U-shaped notches using the cardboard pattern from earlier.
Here's a closer look of how the OSB shelf fits into the 2x4 support posts.
Looking at this picture you might think i forgot a few steps, but actually i didn't. Putting the OSB shelves in before attaching the 2x4's was necessary. If i didn't do that first then i would have never been able to get the shelves in.
That's because i had to actually pull the 2x4 uprights apart to be able to slide the shelf boards in and if i screwed the 2x4's in then i wouldn't have been able to pull them apart. Luckily i realized that before attaching all the 2x4 cross beams.
But after cutting all the shelves and fitting them in place i was then able to screw the 2x4 front and back supports together. To make sure it was all square i screwed them in with the shelf on it's side. By this time it was getting pretty big and heavy so i had to get karrie's help to put the shelf down and stand it back up.
But i was able to push it into place by myself and take a look at it. I knew from the start that i was going to have an issue with the shelf not being level because the concrete slab in the garage is much higher near the back wall. You can see the crack in the slab underneath the shelf.
I thought about all the different ways i was going to make sure it was level. I though about making the front legs longer or maybe trimming the back legs. But i decided that the best idea was to just make the shelf square and level and then deal with the uneven floor afterwords. It was off quite a bit.
So i lifted up the shelf on the right side and, after trying a series of different thickness boards, found out that using two 2x4's would make the shelf almost perfect.
Close enough for me.
I pushed the shelf back into the corner as much as i could and did a few things to make sure it wouldn't move. I screwed the floor 2x4's together and attached the upright to them with just one screw
Then, so that the shelf didn't tip over, i screwed it to the wall in a few places.
Here's the finished shelf in place, level and secured to the wall.
I actually got really lucky. The second shelf cleared the handle of the old door by a couple of millimeters. I totally didn't think about the door handle until i went to push it in place. If it didn't fit i guess i would have had to trim a few inches off the legs.
Then it was time to start loading up the shelves. Hopefully it will have enough room for everything. otherwise i'll have to build another one.
I took a break, then came back a few hours later to start hanging stuff on the wall. I used those rubber coated hooks and screwed them into the studs behind the drywall. I admit that i got a little crazy hanging the wood bench i made for Karrie on the ceiling, but it did save a lot of room.
Over the winter Karrie and i are going to go through all the stuff we have in boxes in the basement and sort them. Some of the less important stuff can go on these bottom shelves. I haven't totally fill it up just yet.
Here's a summary video of the storage shelf being built.
And here is a link to another storage shelf for the basement.
EDIT:
New Step-By-Step video of the storage shelf being built
EDIT: PDF Templates
Some very nice anonymous person in the comments made a PDF of the the template. Here's a link to it Shelf PDF Templates

.JPG)
.jpg)


.jpg)







.JPG)

.JPG)
.JPG)


.JPG)


65 comments:
Used your plans today to build a shelf in the garage. Worked perfect.
Sweet.
Here's a youtube video i created to kind of summarize the whole process:
Build Garage Shelf
Awesome ! Very nice clean job !
David, I can't thank you enough for this. This worked out amazingly well. I also find it crazy that you live in Sterling Heights - I'm from Grand Rapids, and just moved up to Rockford. I threw you a shout out in my own reno blog, since your step-by-step was so fantastic. Thanks for being awesome.
Thank you so much for the detailed pictures of how you constructed the shelves and for making your plans public!! Enormously helpful : )
Are 2x4s overkill for this project? I'm planning on building a similar set of shelves but I'm thinking about using 2x2s.
This would be cheaper and leave more accessible space on each shelf (since the horizontal support piece would block less space).
Thanks.
You could try using 2x2's for the horizontal boards. For the Legs i would stick with the 2x4's though.
I'm not sure how much cheaper 2x2's are compared to 2x4's. And i always found it difficult to find nice straight 2x2's that didn't have bends or splits in them. I was able to buy 8' 2x4's at Lowe's for something like $2.50 each. And in my opinion 2x4's are the right thing to use, i wasn't afraid of putting anything heavy it. Each shelf could easily support a few hundred pounds.
But in terms of space, ya it is a bummer the 3.5" that you lose from the boards hanging down, maybe for that a 2x2 would be better.
Great write up, Dave. I have been tossing and turning about buying some nice industrial strength shelves from Depot or building shelves and this write-up may have made the difference. I will be doing this on my day off tomorrow.
Shawn
Livonia, MI
HI Dave. Great plans. Did you screw the OSB to the 2X4s?
No.
I was originally planning to but it didn't need it. The shelf was strong and rigid enough without screwing the shelves down.
Thanks for the reply...
Two suggestions to consider from the other materials comments by others earlier:
Could consider gluing the assembly as you screw it. I understand that the joints are strong enough that once dried, you can take the screws out.
Also, I have been considering the 2x3s. they are about $1 cheaper per each than the 2x4s; a compromise to the 2x2s mentioned by someone else. I have made similar shelves out of 2x2s along time ago and they turned out pretty well. I did glued those.
Thanks again for sharing.
Glue would definitely be better than screws. I was just thinking that one day i would have to disassemble the shelves. If we ever moved, or we were thinking of remodeling the basement and need more room. With all those boards glued together i would be screwed.
And 2x3's are a great idea. The 2x4's i used are probably overkill for anything i can fit on those shelves. You could even do 2x4's for the 4 legs then 2x3's for the cross boards. It would also cut down on the weight.
Good Luck.
Here's another picture of the patterns that many people had been asking about.
Cardboard Template Pattern
You don't really need to have templates like this to build the shelf. It just made it easier than measuring every time. The whole point of the screw pattern is so that the screws missed each other when being screwed in from the 2 different directions.
For the 3 hole template can you add the distance from the edge to each of the holes?
It would be at the center of the 1-1/2" board so that's 3/4" from the edges.
Thanks Dave! I just built a workbench using the technique you showed here. I just put in two shelves instead of the four you have, the bottom shelf for storage and the top one is the work surface. I also extended the back two legs up an additional 2 feet in order to attach some pegboard. It's a really strong design - I've put my whole weight on this thing and it doesn't budge!
I just want to be sure. How did you put on the top shelf?
The top shelf board is just sitting up there, no nails, glue or screws. So far it's been fine on the 3 shelves i've built. The friction and weight holds it in place more or less.
If you are worried it might move or fall you could use a couple of nails or screws to hold it in place
Nice shelf. I built one similar, but then had another idea for my west wall. I used 1x2's, and 16" wire shelves from HD. Made a ladder frame of the 1x2's, used more as uprights, screwed them into the studs, and lag bolted the uprights. The wire shelves were flipped upside down for a lip, and done. Wish I could attach a pic.
Thank you Dave, I've just made one following your instructions.
Dave. I saw a great video earlier today where you build a moveable 'cart' with removeable boxes for nults, bolts, washers etc. i think 12 of them. Pretty neat. I'm thinking of doing the same thing!
BUT. The reason for writing is slightly different. I spotted your work benches in the background. Have you got videos and plans for them?
Thanks!
No actually i don't. I built those work benches a few years ago. They are basically the same "concept" as the shelves. For simplicity they are 8' long and 2' deep. The top is 3/4" melamine which isn't cheap, $32. The frame is 2x4's. Just a rectangular frame to support the top and two 'H' shaped legs with a cross bar for lengthwise for rigidity. Maybe i'll look and see if i have some pictures i took while building them.
Dave,
Is there a printable template for the pattern you used for the shelves. I thought you indicated on your video that there would be a printout on your blog. Thanks
Here's what i have. I never got around to making a printable pattern but all the dimensions are on this: https://plus.google.com/+DaveWirth/posts/4ciUUnYxDiX
Thanks Dave for the videos. I'm about to make one of these & made this PDF of your templates. Does it look right?
https://drive.google.com/file/d/0BwSKONsb-xIgUWFsUXJWY0dIR3M/view?usp=sharing
Also, do you recommend two 2x4's (vertically) in the middle or is this pretty sturdy?
Dude....thank you.
The template is perfect. I've been too busy/lazy to make one, and it seems like that's what people have the most questions about. I'll put a link to it in the blog so that people can use it. Thanks again.
As far as doubling up the vertical 2x4's, i haven't needed to. The 3 shelves that i have built have only needed to carry maybe 200-300 pounds and just the single leg has been fine.
Thanks Dave..
I'm building these today! Great design..best I could find on the net.
The PDF template seems to have some dimensions wrong though as far as I can tell. Specifically the one that is 3"x4" (since the 2x4 is actually 3.5" in width). I could be wrong though. I was never able to get it to print at the exact dimensions either (maybe my printer's fault).
Brian,
I had the same problem at first. At the bottom of the PDF page Is a link to download the drawings. After I downloaded them, they printed to size.
Dave,
Many thanks for sharing! Its proved to be very helpful.
~ Robin Williams
Why not cut the OSB sheets into quarters (2' x 4')? Then you can set them in after the frame is done.
""Anonymous said...
Why not cut the OSB sheets into quarters (2' x 4')? Then you can set them in after the frame is done""
Ya that's a good idea, it would make the assembly go a lot smoother. You wouldn't have to deal with the bending of the boards. You would just have that seam down the middle.
Or like some people have said, just cut the boards square and a little bit shorter. That way you don't have to notch anything, but you have the gaps at the ends.
I couldn't help to disagree that you would have modified the project due to the door knob, that is now render non functional. It would take 2 minutes and a philip screw driver to remove the door knob; and one can seal the hole in the door with any lid from any tin can that we throw away everytime we open a can of corn or greenbeans, etc. One could caulk and pack with insulating foam or not, I am not sure I'd worry about it, but some people maight. The big piece of furniture or a couple of long screws will impede anyone from entering throug that door.
Thanks David for the great plans. I enjoyed building them as per your drawings and found them to be very sturdy and an excellent storage solution. Here's a link to my blog with pictures of the build if you are interested.
http://www.beesnotincluded.com/2015/01/basement-storage-shelves.html
Thanks again,
Chris
Just an FYI... it is against building code, and VERY unsafe to block an exit door from the garage.
The garage is attached to the house so there's another door on the other side. Ya i wouldn't cover up the only door in.
Hey Dave - did quite a lot of research on doing this and what you put together looks like the simplest and most efficient so thanks for that. I want to go a little higher than 8 feet. In that case do you suggest I just make another smaller shelf (to take advantage of high ceilings), put on top, wallmount it and find a way to secure it to the first 8 foot shelf?
Thanks.
Gary
hey Dave - great plans. did some research and yours looked the most straightforward, best explanation so I'm going with your design. thanks for all the effort.
question...
i want to take the shelves up to about 11 feet (wall mounted of course for safety) as I have high garage ceilings.
is it as easy as just making another 3 foot shelf, attaching it to the top of the 8 foot design and securing to the wall?
any words of wisdom to ensure success with those modifications?
thanks again!
11 feet sounds a bit scary. That might be a lot of weight for 1 2x4 to carry. You might want to double up the legs with another board. Also some people commented that nails have a higher shear strength than drywall screws, so it would be safer. I haven't had any problems with screws and if i ever had to take it apart, screws are obviously easier.
Also i'm not sure how you would get the 3' shelf up on top. Might need a few peoples help to get it up there. And use plenty of metal support brackets for the wall and connecting the two together.
Let us know how it turns out.
Dave
thanks Dave - what do you mean "double up" the legs with another board? Can you give me some further ideas as to what you are thinking?
for the legs, i found 2x4x12s and i was planning to use 4 of those (one each for the leg).
my hope was by fastening the shelving to the wall, it would lessen the burden on the 2x4x12s.
thoughts?
thanks in advance!
Well it depends on how heavy of stuff you plan on putting on the shelves. But by double up i mean nail two of those 2x4x12's together. Those vertical legs at the bottom would be the weak point.
Hi Dave I like your shelf plans. Simple sturdy and very adjustable / functional.Great job!
Thanks,
Bryan
Hey Dave...just completed the shelves. Great design. I studied it for three weeks before I began it. Many thanks!
Mike...baltimore
The PDF template is wrong. Might want to fix it so people do mess up drilling pilot holes.
Super cool!
excellent! I'd found another good shelving guide using RTC2Z Connectors - but those are $4.50 a piece, and I would need 16 of them, which is a huge cost hit. I love the way the 2x4's lock together with the deck screws. I'm planning on following this design, but for 4'x3' shelves, 3/4" thick - do you think any modifications would be necessary for supporting each shelf? Any idea which each shelf can support in lbs for your design? Or what the entire unit can handle? thanks again, this is terrific!!!!
Thank you, this gave me just the idea i needed to build a toy storage shelf for my living room! I gussied it up a bit by sitting my plywood shelf down inside the 2x4s after routing them out. This also means i can remove the shelves to clean them! And I covered the back and the exposed side because it's in my living room. Anyway, i appreciate your making the sketchup file available.
Thanks, I'll be using this for some shelf space in a baseball storage room. I plan on lowering the bottom shelf so it's just off the floor, and using that shelf for 50lb bags of chalk. I'll have to add support and legs for that amount of weight. I'll have to figure that out on the fly. The other shelves won't see that much weight. Bases, helmets, bats - that sort of stuff.
Hi Dave,
I just found yourproject on Pintrest. Nice shleving unit. My dad has been doing it that way FOR YEARS!!! So good job. As for one of the posts, why would you even want to take out the screws and just use glue? Makes no sense. Plus, it removes any structural integrity that you have. Third, by taking out the screws, it just make another unnecessary step....leave 'em in.
Also, I am trying to understand why you blocked the only other access door to your garage? Again, it made no sense to me. My thinking is, is that you keep the door un-blocked so that you can use the garage in not-so-good weather and winter. Also, it becomes a major safety issue.
Other than those points, great job! And good to know about Sketch-Up. I'm an AutoCAD Civil user of days past, so knowing that I can get a free CAD program for home is great!
Hoppy
Guy,
As for blocking the door, there's another door on the other side which goes into the house. That door hasn't been opened in decades and is actually nailed shut. Ya i wouldn't block the only way out of the garage (other than the garage door)
About the taking out of screws i'm not sure what you mean. Maybe i was saying that if i was building something permanent that i would use nails glue, since glue would be stronger. But i assume that i will have to disassemble this at some point and screws have been fine so far.
I just want to say thank you for putting this page up! I built the shelving unit this weekend and it turned out perfect. I had to tweak it a bit because I only had 6 feet of wall space to use instead of 8, and I had to customize the shelf openings because it would set in front of the breaker box and I had to leave room so that could be opened. BUT, this way of building it worked perfect and I thank you for putting this up online so I could find it!
Great! Just what I need, but a couple of observations: How do you do your laundry with all that other stuff piled on and around the washer and dryer? As a librarian, I'm tellin' ya: take that library sign back to the street department.
Why did you block the garage door?
Thanks so very much for publishing these plans - built the shelves and they worked out great!
Thanks so much for this incredible guide, used it today. Best approach to shelf building I could find on the net! The screw templates were a cracking idea. Cheers David.
Ps I have a wedge shaped garage so made some mods, the left end is approx 12cm (4.75") deeper than the right end, (67cm vs 55cm) so the shelf is a trapezoid with angles of approx 90,90,95,85. It's still 8' or 2.4m long but a 3 shelf variant.
I went with 2by4 for the uprights and 2.4m rear cross supports (which dried is really 1.5"x3.5" or 63x89mm CLS from B&Q x 7). I've then saved a bit of weight and money and more importantly gained some shelf access height by using 2by3 (actually 1.5"x2.5" 38x63mm CLS from B&Q x 5) for the 'steps' of the two 'ladders' and the 2.4m front cross supports.
Looking at the bend when loading the shelves I would not go 2x3 on the rear cross supports to anyone thinking of that, I'd suggest sticking with 2x4 there. I chose 11mm OSB as shelving, I had a sheet of ply lying around for my 3rd shelf so only need to buy one sheet of OSB £47 total - nb otherwise the std 4 shelf set-up would have been c.£60.
How has the OSB held over over the past few years?
I haven't had any problems with the OSB, nothing has broken. Although a $20 sheet of 5/8" plywood wouldn't cost that much more and would work just as well.
I built this shelf per your design this weekend. I was confused by the templates provided in the PDF. The screw templates shown are 4" x 3-1/2" and 4" x 3". However, there is no dimension 4" wide on a 2x4.
I modified this to be 3-1/2" x 3-1/2" (3 hole template) and 3-1/2" x 3" (4 hole template) when making my cardboard templates. Then the holes lined up the same as in your pictures.
Hey Dave, Thanks for you plans for these shelves; trying them in my garage today.
Question: Did you screw the OSB board to the the 2x4 beams, or are they just resting on them?
thanks again!
I didn't attach any of the OSB to the 2x4's. A few nails or screws would lock everything together and make it stronger, but i just set them in place and didn't attach them.
I've been building 2x4 OSB shelves for 20 years. Mine tend to be either 2' wide x 8' if along a wall or when in the open, 4' wide x 8' long. Essentially full OSB sheets that can be accessed from either side. Shelves are spaced so you can use totes on the shelves. These things are easy and cheap to build.
Just built the shelves, came out great! PDF is off so don't use that. These things are built seriously well, very sturdy!
Me too, just built two of those shelves this weekend (15 in. wide, 12 ft. long for my space) and they are awesome. I am very thankful for the detailed instructions provided! Fredericton, NB
Why on earth is the only clear picture of the orientation of the three screws the WRONG way around. sigh
Used your plans to build two sets, with 3' deep shelves instead of 2' deep. The information, videos, and templates you provided were great. You made it appear like I actually knew what I was doing. (I do have to admit, with 3' deep shelves they are bigger and heavier. I call them the monster twins.)
Thanks for the plans and templates for this! Made my life easy and the shelves are prefect for the garage where I needed it. I altered the size to a 4'X8' and only 19" shelves to fit the space but it was just what I needed! Appreciate it!
It won’t let me download the plans or the template. Any help?
Post a Comment