Wood Bench
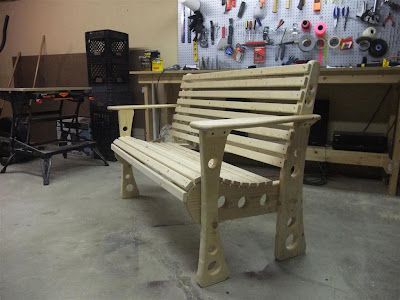
Karrie asked if i could make a quick and simple bench for her back yard, just cut a couple of 2x4's and nail them together. Instead i decided to make this: 
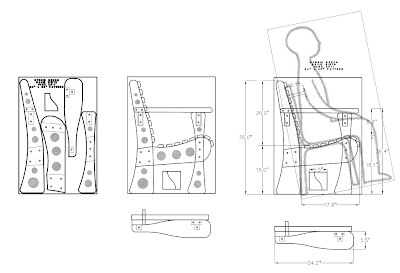
Obviously it took a bit more time and effort but it was basically the same cost, right around $30. I measured several existing chairs to get the right dimensions and sketched several different designs on paper until i ended up with something i liked. Then i drew it on AutoCAD to get the right dimensions and made sure it all went together correctly. Here's an image of the AutoCAD drawings i made. Here are the actual PDF files:
PDF 1
PDF 2
I printed out the full size pattern then cut out the pieces. I added the holes to lighten the weight, which i think it makes it look better too. Again form and function working together.
I spent a few hours tracing the patterns onto the wood, then cut out all the pieces.

I used a router to round over all the edges, then screwed and glued everything together.

There were a few surprises. One major change was that i decided to make it 4' wide instead of 5' wide. When i put the first 2 slats on i realized that it was too wide, so i cut them down to 4'. That also meant that it was stronger and there would be no wasted wood since they were 8' boards.
It didn't turn out exactly as i hoped. The seat could be longer and back rest could have been be more comfortable.

Once i had it all together i took off the slats then sanded, stained and put two coats of polyurethane on everything.


Obviously it took a bit more time and effort but it was basically the same cost, right around $30. I measured several existing chairs to get the right dimensions and sketched several different designs on paper until i ended up with something i liked. Then i drew it on AutoCAD to get the right dimensions and made sure it all went together correctly. Here's an image of the AutoCAD drawings i made.
 Here are the actual PDF files:
 PDF 1
PDF 2
I printed out the full size pattern then cut out the pieces. I added the holes to lighten the weight, which i think it makes it look better too. Again form and function working together.

I spent a few hours tracing the patterns onto the wood, then cut out all the pieces.

I used a router to round over all the edges, then screwed and glued everything together.


There were a few surprises. One major change was that i decided to make it 4' wide instead of 5' wide. When i put the first 2 slats on i realized that it was too wide, so i cut them down to 4'. That also meant that it was stronger and there would be no wasted wood since they were 8' boards.

It didn't turn out exactly as i hoped. The seat could be longer and back rest could have been be more comfortable.


Once i had it all together i took off the slats then sanded, stained and put two coats of polyurethane on everything.


No comments:
Post a Comment