Blogger SEO Experiment
It takes just as long to do something wrong as it does to do something right.
Since writing about Google AdSense and Tips for Increasing Page Views i have continued to read about more ways to increase page views and make money through Google AdSense.
It has been a bit overwhelming with all of the techniques people use. The goal is to get people to visit your site and click on your ads. But there are thousands of ways to do that. The big problem that i've found is Not Enough Time.
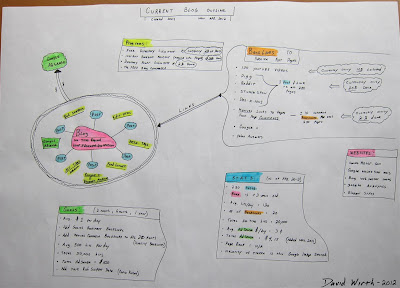
Here is what i created to help myself better understand the whole process. This is a graphical view of my current blog SEO profile:
And this is what i was planning on making:
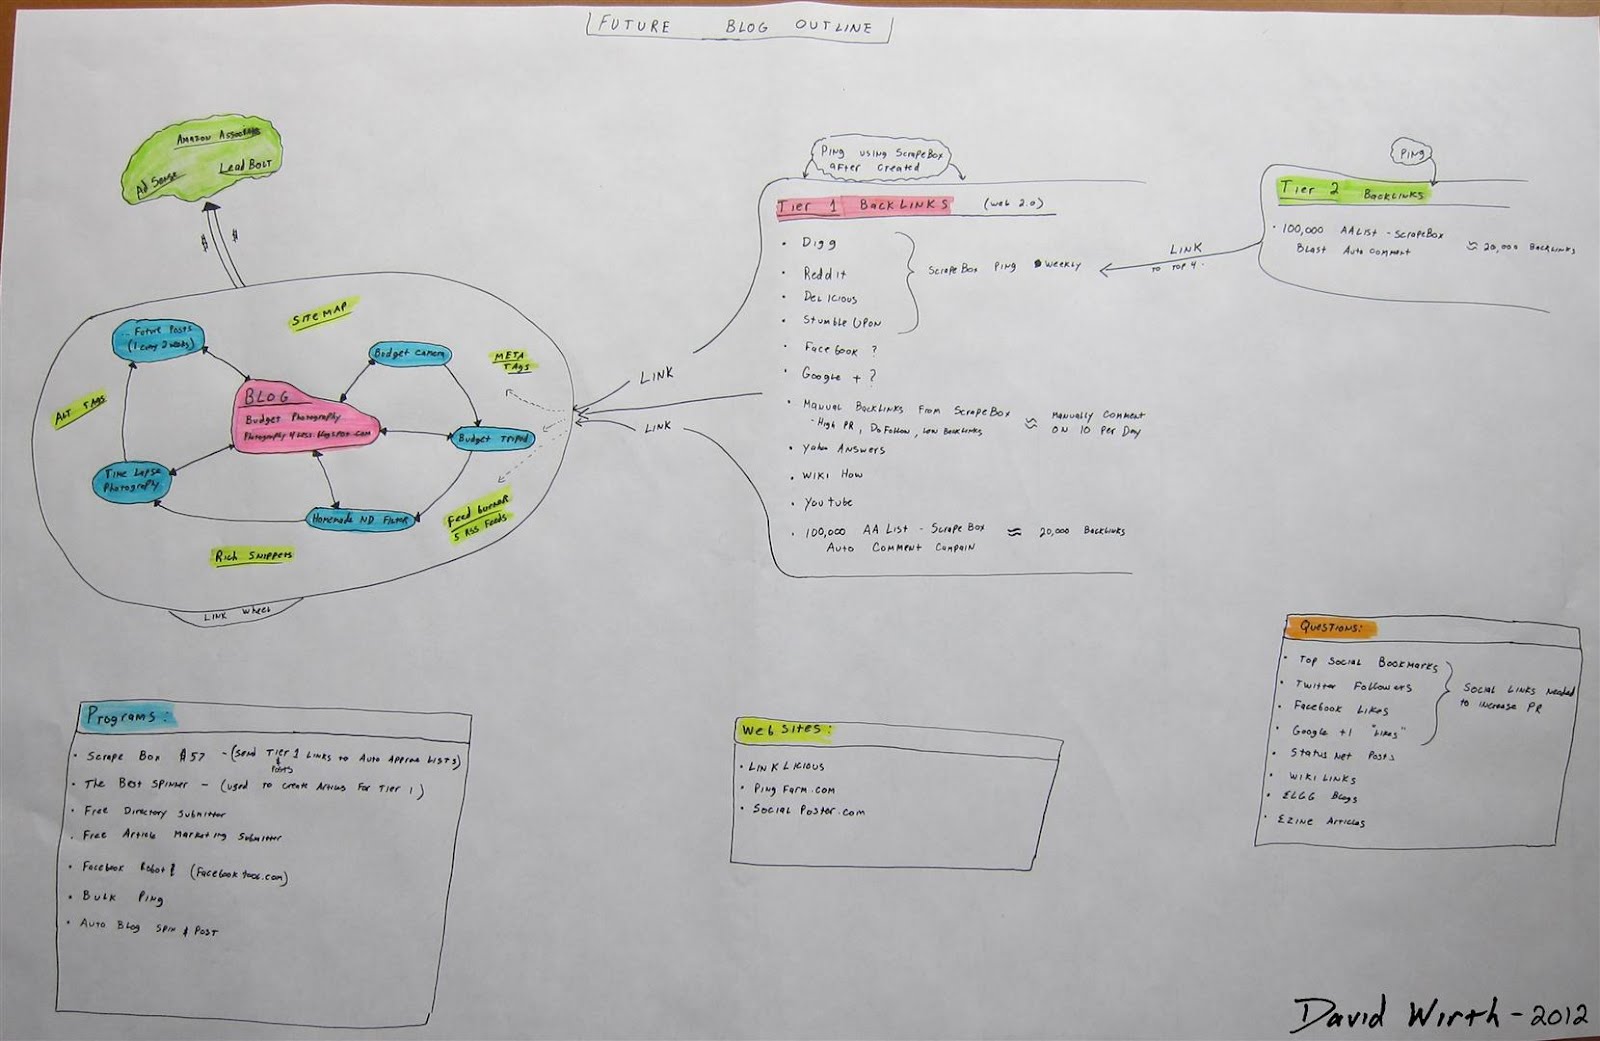
Long story short i decided to forget about making a new blog and focus more on "tweaking" my current pages. So as of right now, my Future Blog Outline is on the back burner.
Note:
This is a LONG TERM project and will take several months after all the work is done to see the final results.
Creating Backlinks:
This is the most important thing you should do to improve your site.
One quick example i read about, was similar to the idea i wrote about earlier, where you create 2 Yahoo accounts, then in Yahoo Answers, you ask a question with 1 account then answer it with the second. In the answer you paste a link to your site. Then back to the first account where you rate that answer as the best. This creates a backlink to your site that Google rates highly.
The new method i read about is to add a link to your site in Wikipedia. Or create a Wikipedia page describing something and include a link to your site. Here's an example of a Wikipedia page i quickly wrote to with links at the bottom to my Welding Glass ND Filter and ND Filter at Lake Erie. I quickly realized that this would take a very long time so i gave up on it.
The real thing i wanted to do was to Automate the entire process of making backlinks. I kept reading about a program called ScrabeBox. At first i used it to Auto Comment on 300,000 blogs. I just had to enter a name, email, URL and various comments and ScrapeBox would automatically post 1 comment to each blog.
But the more i read, the more i learned that Google is more focused on Quality Backlinks. Thousands of backlinks are still good, but having just a few backlinks from quality sites is just as good. So i used ScrapeBox again, but this time i sorted the list based on specific keywords and page ranks.
For example, lets say i wanted to create backlinks to my page about IQ Light. I would type in IQ Light into the keyword, scrape for thousands of pages related to that word. Then sort by page rank and keep just the best. Then sort out just the pages with low outbound links. (the fewer the number of outbound links a page has, the better my link will look)
I would have a list of 10-20 blogs that i could manually go to and type in a specific comment and link to my blog. This way i would have a better chance of the comment getting approved by the blog owner.
Sometimes it worked, sometimes it didn't. Also even if it did work didn't mean that i would get any more page views, just that i had 1 more backlink to my site, which would raise my ranking.
But every once in a while the backlink made a huge difference. One day i commented on a site called Mother Nature Network (MNN). It was just something like "ya i have bamboo in my backyard in michigan, check out some of the pictures" and added a link to one of my pages about bamboo. Because of that one link i've since had over 1000 links in just the past 3 weeks. Look at the first link under Posts: and the first and third link under Traffic Sources:.
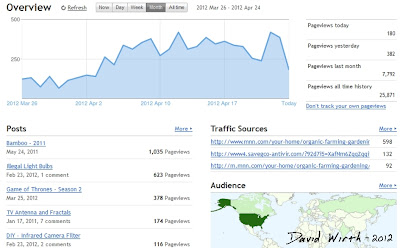
It just goes to show that the more backlinks you have, the more traffic you will get and the better your page rank. And as opposed to many of the steps i'm doing, this one had an immediate result from something i did. So this is definitely something i need to continue doing. The only problem is that once again, i have 280 pages and it's going to take some time.
Social Bookmarks:
I started manually posting to just 3 sites: Digg, StumbleUpon and Del.ic.ious. It was a slow process of copying and pasting the title, URL, keyword and description. But when i checked my Blogger Stats i was surprised how many people viewed my page through those links. I just needed a faster way to submit all of my 280 pages.
Then i found socialposter.com where you only had to enter the information once. It was still fairly slow because you still had to visit and submit to each site.
Then i discovered Onlywire.com. This was what i was really looking for. First you sign up for 30-40 sites like Facebook, Twitter, Tumblr, Google+ and OnlyWire saves all of your information. Then you type in the information for the page you want to submit, click publish and OnlyWire will automatically post to all 40 sites.
The only problem with it is that with the free version, you are limited to 300 post per month. 300 may seem like a lot but it's really only about 8 submissions. Seeing as i have 280 blog posts it will take me around 24 month to submit all of my pages. So i am also using other similar pages to auto-post.
CTR:
Then i read more about Click Thru Rate (CTR). This is the percentage of how many people open up a page with ads vs the number of times the ads are clicked. After 8,660 views of my pages with ads, only 29 people had clicked on them, giving me a CTR of just 0.33%. Which means that for every 1000 people that view my ads i only make $1.93.
In order to increase the CTR i needed to rearrange my page layout. I found that most people view web pages like this:
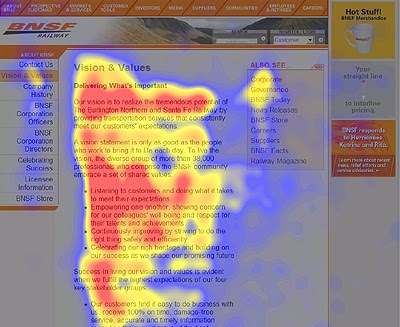
This is called a Heatmap. It shows where peoples eyes look most. Notice the ads on the right side of the page do not get any attention. Partially because most countries read left to right and partially because we are now trained to ignore ads.
So i decided to change my layout from this (having the large ad on the top right):
Hopefully by changing the layout i would get a higher CTR. I'll be checking the % over the next month.
Backlinks from Directories:
Submitting page to Directories, which are sites that don't go out and crawl for web pages, like Google, but rather people submit their pages to them.
This can be done manually by searching for Directory's, clicking on "Submit URL" and typing in all the information it asks for like Name, URL, Email...The whole process took around 5 minutes per site.
So i like with the Social Bookmarks found a program to try and speed up the process. It saved the information and allowed you to import a list of directory pages. You would view the page, it would automatically input your information and submit. However this too started to become very tedious.
Then i discovered Free Directory Submitter, this program that will automate the process even better. You enter your information the same as in Directory Submitter, but it goes a step further by allowing multiple Title and Descriptions. That is great because Google will notice if suddenly 200 links are created overnight with the exact same text. Then when the process is started, it finds the pages, enters the info at random and then all you have to do is enter the Captcha text. Instead of taking 5 minutes per page this drops it down to around 3-10 seconds.
Summary:
There are lots and lots of programs, websites, forums, directories and articles that you can use to achieve your goal. I can't remember everything i have used and all the steps i have read about. But for me the most important thing was to use these tool to try and speed up the processes.
I'm still far from being an expert in anything, but by doing some of these basic steps i have made a huge improvement in my Blogger Stats. As you can see from the large increase in my last 2 months. I've gone from averaging 100 views per month, to 1000 views per month, to as of right now 6,000 views per month.

From the very beginning of this process i always read that this is a long term process, don't expect immediate results. I hope it increases even more in the future.
Since writing about Google AdSense and Tips for Increasing Page Views i have continued to read about more ways to increase page views and make money through Google AdSense.
Here is what i created to help myself better understand the whole process. This is a graphical view of my current blog SEO profile:

And this is what i was planning on making:

Long story short i decided to forget about making a new blog and focus more on "tweaking" my current pages. So as of right now, my Future Blog Outline is on the back burner.
Note:
This is a LONG TERM project and will take several months after all the work is done to see the final results.
Creating Backlinks:
This is the most important thing you should do to improve your site.
One quick example i read about, was similar to the idea i wrote about earlier, where you create 2 Yahoo accounts, then in Yahoo Answers, you ask a question with 1 account then answer it with the second. In the answer you paste a link to your site. Then back to the first account where you rate that answer as the best. This creates a backlink to your site that Google rates highly.
The new method i read about is to add a link to your site in Wikipedia. Or create a Wikipedia page describing something and include a link to your site. Here's an example of a Wikipedia page i quickly wrote to with links at the bottom to my Welding Glass ND Filter and ND Filter at Lake Erie. I quickly realized that this would take a very long time so i gave up on it.
The real thing i wanted to do was to Automate the entire process of making backlinks. I kept reading about a program called ScrabeBox. At first i used it to Auto Comment on 300,000 blogs. I just had to enter a name, email, URL and various comments and ScrapeBox would automatically post 1 comment to each blog.
But the more i read, the more i learned that Google is more focused on Quality Backlinks. Thousands of backlinks are still good, but having just a few backlinks from quality sites is just as good. So i used ScrapeBox again, but this time i sorted the list based on specific keywords and page ranks.
For example, lets say i wanted to create backlinks to my page about IQ Light. I would type in IQ Light into the keyword, scrape for thousands of pages related to that word. Then sort by page rank and keep just the best. Then sort out just the pages with low outbound links. (the fewer the number of outbound links a page has, the better my link will look)
I would have a list of 10-20 blogs that i could manually go to and type in a specific comment and link to my blog. This way i would have a better chance of the comment getting approved by the blog owner.
Sometimes it worked, sometimes it didn't. Also even if it did work didn't mean that i would get any more page views, just that i had 1 more backlink to my site, which would raise my ranking.
But every once in a while the backlink made a huge difference. One day i commented on a site called Mother Nature Network (MNN). It was just something like "ya i have bamboo in my backyard in michigan, check out some of the pictures" and added a link to one of my pages about bamboo. Because of that one link i've since had over 1000 links in just the past 3 weeks. Look at the first link under Posts: and the first and third link under Traffic Sources:.

It just goes to show that the more backlinks you have, the more traffic you will get and the better your page rank. And as opposed to many of the steps i'm doing, this one had an immediate result from something i did. So this is definitely something i need to continue doing. The only problem is that once again, i have 280 pages and it's going to take some time.
Social Bookmarks:
I started manually posting to just 3 sites: Digg, StumbleUpon and Del.ic.ious. It was a slow process of copying and pasting the title, URL, keyword and description. But when i checked my Blogger Stats i was surprised how many people viewed my page through those links. I just needed a faster way to submit all of my 280 pages.
Then i found socialposter.com where you only had to enter the information once. It was still fairly slow because you still had to visit and submit to each site.
Then i discovered Onlywire.com. This was what i was really looking for. First you sign up for 30-40 sites like Facebook, Twitter, Tumblr, Google+ and OnlyWire saves all of your information. Then you type in the information for the page you want to submit, click publish and OnlyWire will automatically post to all 40 sites.
The only problem with it is that with the free version, you are limited to 300 post per month. 300 may seem like a lot but it's really only about 8 submissions. Seeing as i have 280 blog posts it will take me around 24 month to submit all of my pages. So i am also using other similar pages to auto-post.
CTR:
Then i read more about Click Thru Rate (CTR). This is the percentage of how many people open up a page with ads vs the number of times the ads are clicked. After 8,660 views of my pages with ads, only 29 people had clicked on them, giving me a CTR of just 0.33%. Which means that for every 1000 people that view my ads i only make $1.93.
In order to increase the CTR i needed to rearrange my page layout. I found that most people view web pages like this:

This is called a Heatmap. It shows where peoples eyes look most. Notice the ads on the right side of the page do not get any attention. Partially because most countries read left to right and partially because we are now trained to ignore ads.
So i decided to change my layout from this (having the large ad on the top right):

Hopefully by changing the layout i would get a higher CTR. I'll be checking the % over the next month.
Backlinks from Directories:
Submitting page to Directories, which are sites that don't go out and crawl for web pages, like Google, but rather people submit their pages to them.
This can be done manually by searching for Directory's, clicking on "Submit URL" and typing in all the information it asks for like Name, URL, Email...The whole process took around 5 minutes per site.
So i like with the Social Bookmarks found a program to try and speed up the process. It saved the information and allowed you to import a list of directory pages. You would view the page, it would automatically input your information and submit. However this too started to become very tedious.
Then i discovered Free Directory Submitter, this program that will automate the process even better. You enter your information the same as in Directory Submitter, but it goes a step further by allowing multiple Title and Descriptions. That is great because Google will notice if suddenly 200 links are created overnight with the exact same text. Then when the process is started, it finds the pages, enters the info at random and then all you have to do is enter the Captcha text. Instead of taking 5 minutes per page this drops it down to around 3-10 seconds.
Summary:
There are lots and lots of programs, websites, forums, directories and articles that you can use to achieve your goal. I can't remember everything i have used and all the steps i have read about. But for me the most important thing was to use these tool to try and speed up the processes.
I'm still far from being an expert in anything, but by doing some of these basic steps i have made a huge improvement in my Blogger Stats. As you can see from the large increase in my last 2 months. I've gone from averaging 100 views per month, to 1000 views per month, to as of right now 6,000 views per month.

From the very beginning of this process i always read that this is a long term process, don't expect immediate results. I hope it increases even more in the future.
