DIY - How to Make a Tyvek Flowform Kite
I wanted to make a new flow-form kite to replace the one that i lost while doing kite aerial photography (KAP). Also because i saw instructions and it looked a lot easier then the last Rokkaku Kite i made.
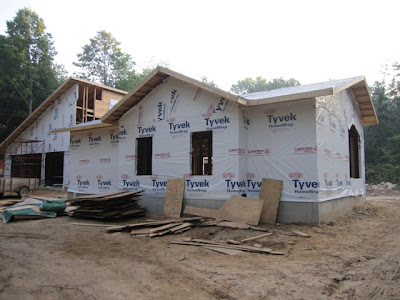
A flow-form kite doesn't require any supports. While reading about them i saw that some people made them out of Tyvek, which is a type of plastic houses are wrapped in to act as a vapor barrier.
I checked Lowe's but all they had was their own type of house wrap and it only came in 160' lengths by 10' high and was $100.
Then on the way home from my sister's, Karrie and i stopped at Menard's. They had several different types and i decided on a soft, non-woven wrap that was only 3' high. It's the $35 one on the left.
NovaWrap

It's actually really strong, i can barely rip it with my hands.
Here's what it looks like up close. 
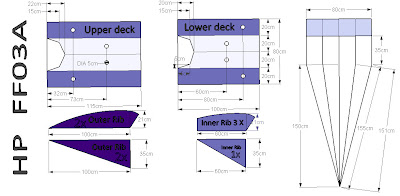
I looked at several patterns online and decided to go with this: The FF03A. It seemed simple, strong and stable. So i copied this drawing into AutoCAD and then traced the lines.
AutoCAD allowed me to get actual dimensions of the material and make patterns.
I ended up changing the dimensions. The original top was 115cm, i first changed it to 52".
Then scaled it down to this size of 24" x 35" for the upper deck.
In my head 24" x 36" seemed a little small for a kite but when i printed out the full size patterns i realized how big it was. I might end up making the larger 36" x 52" kite but first i want to see how this smaller one fly's. It's not like i have a limited amount of Tyvek, it came in a 100' roll.
The upper and lower deck.
The sides and inner ribs.
Here's the top deck cut out.
All of the pieces cut out.
I tested 4 different types of tape. After sticking them i made sure that i really pressed the tape into the Tyvek with the back side of a knife.
The tape in order:

The Gorilla Glue duct tape didn't stick well and was heavy. The HD clear Duck tape didn't stick well either. The 3M duct tape and Tartan packaging tape worked equally well. But since the Tartan tape was lighter i went with that. Also i think it was the cheapest, about $2.
Taping the fins.


The hardest part was the final upper deck. It was difficult taping the insides all at once.
Here it is with the rigging lines and tails attached.
Here's what the kite looked like as it flew at a low height.
But overall it flew surprisingly well. In high or low winds it was fairly steady. And when i was done it hadn't been damaged at all.
A flow-form kite doesn't require any supports. While reading about them i saw that some people made them out of Tyvek, which is a type of plastic houses are wrapped in to act as a vapor barrier.

I checked Lowe's but all they had was their own type of house wrap and it only came in 160' lengths by 10' high and was $100.
Then on the way home from my sister's, Karrie and i stopped at Menard's. They had several different types and i decided on a soft, non-woven wrap that was only 3' high. It's the $35 one on the left.

NovaWrap

It's actually really strong, i can barely rip it with my hands.


I looked at several patterns online and decided to go with this: The FF03A. It seemed simple, strong and stable. So i copied this drawing into AutoCAD and then traced the lines.

AutoCAD allowed me to get actual dimensions of the material and make patterns.

I ended up changing the dimensions. The original top was 115cm, i first changed it to 52".

Then scaled it down to this size of 24" x 35" for the upper deck.

In my head 24" x 36" seemed a little small for a kite but when i printed out the full size patterns i realized how big it was. I might end up making the larger 36" x 52" kite but first i want to see how this smaller one fly's. It's not like i have a limited amount of Tyvek, it came in a 100' roll.
The upper and lower deck.

The sides and inner ribs.

Here's the top deck cut out.

All of the pieces cut out.

The tape in order:
- Gorilla Glue duct tape
- regular 3M duct tape
- clear Tartan packaging tape
- HD clear Duck tape

The Gorilla Glue duct tape didn't stick well and was heavy. The HD clear Duck tape didn't stick well either. The 3M duct tape and Tartan packaging tape worked equally well. But since the Tartan tape was lighter i went with that. Also i think it was the cheapest, about $2.
Taping the fins.


Here it is with the rigging lines and tails attached.
I finally got to test the kite out. It flew ok. The main problem i had was that i didn't use a swivel clip to attach the line to the kite. That caused the kite to keep rotating clockwise until the bridal lines were completely twisted up.
Here's what the kite looked like as it flew at a low height.
But overall it flew surprisingly well. In high or low winds it was fairly steady. And when i was done it hadn't been damaged at all.
Here it is higher up in the air.
Having built the kite, testing it and seeing how well it flew, i'm definitely not ready to tie my $300 Canon S95 camera to it to try and get some aerial pictures. I think we all remember how that ended up.


3 comments:
Does the tail get taped closed, both the straight edge and the circular edge as well, or does the round part stay open?
That same question had me confused for the longest time too. I had to look at several pictures of kites before i figured it out.
The circular part is open to allow air to flow through. But the two flat pieces at either end are taped closed.
Here's a couple of examples of other peoples flowform kite that shows the back end being open.
http://www.alexteo.com/myblog/wp-content/uploads/2009/03/ff-3-25.jpg
http://www.matthijsjanssen.com/wp-content/uploads/2010/10/MG_0071.jpg
Good luck
Dave its a nice kite. i would give you points for being unique and because flied; however it isn't pretty/gorgeous. maybe the use of colors for different parts would help in this area. please understand that i'm not ............... besides that it is impressive putting it together.
Post a Comment