
Rustic Outdoor Cooler Stand - Wood Pallet
Another project that I started working on was a rustic cooler stand, which is made out of old wood pallets. This is another one of those projects Karrie saw on Pinterest. The cool thing about it is that it's not supposed to look brand-new, using old wooden pallets it supposed to have that hand-built rustic look. What's also nice is that you can get wood pallets for free, so the project shouldn't actually cost anything to build.
The first thing I had to do was get the wood pallets themselves. There are lots of shops and stores that leave them out in the back for people to take. At least I think they're for people to take. I ended up getting three or four pallets from behind Home Depot. They had about 60 of them all stacked up.
One thing I would suggest is make sure you are picky about the pallets you are taking. Here's a picture of a palette that it didn't even use.

The wood from this pallet wasn't good enough, there were too many splits down the middle and the boards didn't match up the other palette boards. That's one thing you have to consider is that with the mix match of different types of pallets you might end up getting boards that have different length, widths and thicknesses. I should have spent more time picking out better pallets, that had consistent size and better quality.
I had already sketched up a few plans of what I wanted to make. You can see all the different handle designs that i was thinking of. Also how high to make it and whether or not to have it on wheels.

It turned out that Karrie didn't like any of my ideas for making a handle, so she said she would pick one out.
Then i had to come up with a good idea the basic framework and how it all would all fit together. I wasn't sure about the exact fit but I figured it would kind of worked itself out as I went along. I planned on making the frame out of 1x3 pine with a 1" gap all the way around the cooler.

The next thing I had to do was break the pallets down. This ended up being one of the harder parts of the whole job. I had to use my 3 pound sledgehammer and a crowbar. The difficult part was that the pallets were actually put together really well and I had to remove the boards without damaging them too much.

No matter how careful you are, there is going to be some damaged areas because of the nails that the pallets are to have in them. But if you can get one good side of the board that's all you really need. The damaged part of the board can be put on the inside.
At first I broke down three pallets and thought that would be enough. I didn't end up getting every board from the pallets, I had to pick and choose because some of the boards were too damaged or to split in half. I ended up having to go back and get another pallet because I ran out of boards to use for the legs and lid.

Here's the pile of wood I thought that would be enough. And next to it is the cooler that Karrie and I had bought a few months earlier.
I noticed that in a lot of these cooler stand plans people would remove the lid of the cooler and attach it to the lid of their stand. Removing the lid like that and attaching it to the stand meant that the cooler could not be used for anything else. Karrie and I didn't want to do that, we wanted to be able to remove the cooler and take it with us for other things. That's why in my plans I designed it to have a wood lid which is separate from the cooler lid. You'll see what i mean later.
The first thing I had to do to get started is build a frame for the cooler to sit in. I used 1x3 and 1x2 pine boards for this. Once again I simply used glue and my new nail gun. The 18gauge nail gun made work go by very fast.

Here you can see that I've made the walls of the frame out of 1x3's and then used 1x2's as the bottom supports to hold the cooler. I hope it will be strong enough to hold the weight was the cooler is filled with everything. And like i said earlier I made the frame slightly big so that we could reach in and lift the cooler out by its handles.

Here's the finished inner frame. You can see the gaps on the front and sides. I sort of guessed on the height. Not knowing how thick of boards i was going to use from the pallets.

Actually when I was assembling it I didn't have any wood glue left but I did have a tube of liquid nails. That ended up being an advantage because everything took a lot of glue, there was lots of surface area.

Once I finish the basic framework I started to attach pieces of palette boards to the sides. Again i used Liquid Nails and the nail gun.

Here's what it looks like after the entire case frame was wrapped. All of the nail holes you see were from the large nails used to assemble the pallets, not the small 18gauge nails i used.

Next I wanted to check to see how high to make it. So I set it on top of two milk crates to get an idea. I figured that 36 inches high would be all right although I was planning on adding wheels to the bottom which may would've made it a few inches higher.

I ended up making it 40 inches high because I had a palette boards that were 40 inches long. I figured I could always cut it down shorter at the end. So I started attaching the 40 inch legs with more Liquid Nails and the nail gun.

Once again this was another project that I can imagine making without the ease and convenience of my air compressor and nail gun. It would've taken hours and hours of either pre-drilling and using screws or hand nailing everything together. Plus with the nail gun it only leaves tiny marks that people can't see. It's a much cleaner look.
Here is a view of the basic frame and legs assembled. The legs are just 8 boards, 2 at each corner, which make a corner.

You can see other several layers of words starting with the 1x3 on the inside and the different pallets layering outwards.

Here's what it looks like with the cooler inside. It's okay but the cooler would have to be raised in order for the lid to open freely when I the table surface. That wasn't a big deal, i just glued and nailed 2 additional 1x2's in the bottom to raise it up.

Next I used wood from another pallet to make the table surface. I wanted to use wider boards so that people could set drinks on it if they had to. Again this is why it's a good idea to spend a little more time being picky when selecting the pallets to use. Longer wood for the legs then wider boards for the table top.

After the surface was done I started to make the lid which would cover the cooler. Again I used wood from a different palette which all had the correct thickness and width.

I left a few inches gap at the back just to make sure it would open up without catching the cooler lid. Then I had to decide which direction to align the boards. I tested it with boards going horizontally.

And then I did it with the shorter boards going vertically.

I decided that the shorter vertical boards looked better. So I put some glue on their edges and nailed them in place.

This is with the lid built and just sitting on top. The 2 clamps are on there because the front board was a little warped and i was trying to get them to align flush with the edge boards while the glue was setting.

The finishing touches were to attach the bottle opener to one of the front legs.

And then I had to figure out how to attach the hinges. I never really came up with the correct way to do this. No matter what I tried it seemed like there was always a gap or else the lid would not open up correctly.

I figured it wasn't that big of a deal the rustic cooler was just to be outside. It turns out that there's a small half-inch gap at the back which tapers down flush in the front. But i doubt that anyone will notice.

After Karrie and i looked at it we decided that it wasn't very heavy and so wheels weren't necessary. But it would have to be shortened. Like i said earlier, i only made the legs 40" high at first because that's how long the boards were. I used a hand saw and cut the final height down to 36" high.

There was just 2 more things that needed to be done. First was a quick sanding. Nothing extensive, but i did use a belt sander on the surface to try and smooth that out since people will be putting drinks on it. The second thing i had to do was add two more boards in the bottom of the rack. The cooler was too low and the lid wasn't completely opening all the way. So these two 1x2's raised it up just enough.
.jpg "wood cooler stand, rack, water, leak")
The last thing was to find the right handle. One night Karrie and i went to Hobby Lobby and found these. It's actually a handle and bottle opener.
.jpg "old rustic handle and bottle opener, hobby lobby")
We really liked the look of the handle and for another dollar, just bought the bottle opener too. So attached the new handle and switched the original bottle opener i had with this one. And the cooler stand was done.
.jpg "easy to build cooler, pallet, wood, project")
Here's a closer look at the handle and opener. They tie in with the rustic look of the whole thing.
.jpg "free rustic pallet wood project, cooler stand")
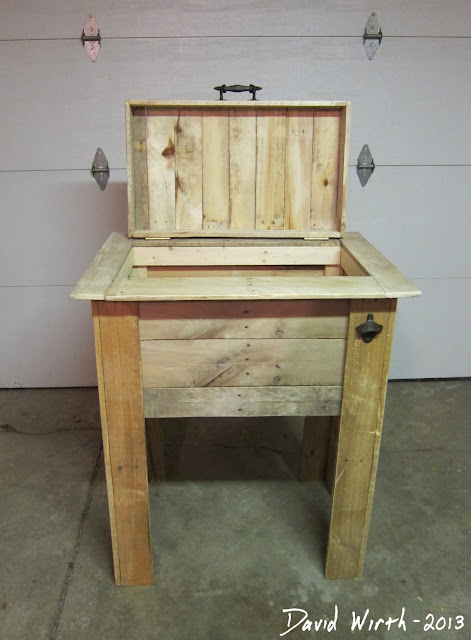
Here's a view from the front with the lid open.
.jpg "simple cooler stand pallet")
One thing that i was worried about which turned out to be no problem at all was the lid. I was thinking about all different ways in which i could stop it from opening too much, but it just ended up stopping itself. You can sort of see from this picture that with the wood lid open it stops when it hits the wood top. Real simple and something that shouldn't break.
.jpg "plans for how to build wood cooler stand out of wood pallets free")
Overall i'm happy with how this turned out. Also it went pretty fast since the rustic look doesn't require tight joints and perfect cuts. Just my kind of project.
The first thing I had to do was get the wood pallets themselves. There are lots of shops and stores that leave them out in the back for people to take. At least I think they're for people to take. I ended up getting three or four pallets from behind Home Depot. They had about 60 of them all stacked up.
One thing I would suggest is make sure you are picky about the pallets you are taking. Here's a picture of a palette that it didn't even use.

The wood from this pallet wasn't good enough, there were too many splits down the middle and the boards didn't match up the other palette boards. That's one thing you have to consider is that with the mix match of different types of pallets you might end up getting boards that have different length, widths and thicknesses. I should have spent more time picking out better pallets, that had consistent size and better quality.
I had already sketched up a few plans of what I wanted to make. You can see all the different handle designs that i was thinking of. Also how high to make it and whether or not to have it on wheels.

It turned out that Karrie didn't like any of my ideas for making a handle, so she said she would pick one out.
Then i had to come up with a good idea the basic framework and how it all would all fit together. I wasn't sure about the exact fit but I figured it would kind of worked itself out as I went along. I planned on making the frame out of 1x3 pine with a 1" gap all the way around the cooler.

The next thing I had to do was break the pallets down. This ended up being one of the harder parts of the whole job. I had to use my 3 pound sledgehammer and a crowbar. The difficult part was that the pallets were actually put together really well and I had to remove the boards without damaging them too much.

No matter how careful you are, there is going to be some damaged areas because of the nails that the pallets are to have in them. But if you can get one good side of the board that's all you really need. The damaged part of the board can be put on the inside.
At first I broke down three pallets and thought that would be enough. I didn't end up getting every board from the pallets, I had to pick and choose because some of the boards were too damaged or to split in half. I ended up having to go back and get another pallet because I ran out of boards to use for the legs and lid.

Here's the pile of wood I thought that would be enough. And next to it is the cooler that Karrie and I had bought a few months earlier.
I noticed that in a lot of these cooler stand plans people would remove the lid of the cooler and attach it to the lid of their stand. Removing the lid like that and attaching it to the stand meant that the cooler could not be used for anything else. Karrie and I didn't want to do that, we wanted to be able to remove the cooler and take it with us for other things. That's why in my plans I designed it to have a wood lid which is separate from the cooler lid. You'll see what i mean later.
The first thing I had to do to get started is build a frame for the cooler to sit in. I used 1x3 and 1x2 pine boards for this. Once again I simply used glue and my new nail gun. The 18gauge nail gun made work go by very fast.

Here you can see that I've made the walls of the frame out of 1x3's and then used 1x2's as the bottom supports to hold the cooler. I hope it will be strong enough to hold the weight was the cooler is filled with everything. And like i said earlier I made the frame slightly big so that we could reach in and lift the cooler out by its handles.

Here's the finished inner frame. You can see the gaps on the front and sides. I sort of guessed on the height. Not knowing how thick of boards i was going to use from the pallets.

Actually when I was assembling it I didn't have any wood glue left but I did have a tube of liquid nails. That ended up being an advantage because everything took a lot of glue, there was lots of surface area.

Once I finish the basic framework I started to attach pieces of palette boards to the sides. Again i used Liquid Nails and the nail gun.

Here's what it looks like after the entire case frame was wrapped. All of the nail holes you see were from the large nails used to assemble the pallets, not the small 18gauge nails i used.

Next I wanted to check to see how high to make it. So I set it on top of two milk crates to get an idea. I figured that 36 inches high would be all right although I was planning on adding wheels to the bottom which may would've made it a few inches higher.

I ended up making it 40 inches high because I had a palette boards that were 40 inches long. I figured I could always cut it down shorter at the end. So I started attaching the 40 inch legs with more Liquid Nails and the nail gun.

Once again this was another project that I can imagine making without the ease and convenience of my air compressor and nail gun. It would've taken hours and hours of either pre-drilling and using screws or hand nailing everything together. Plus with the nail gun it only leaves tiny marks that people can't see. It's a much cleaner look.
Here is a view of the basic frame and legs assembled. The legs are just 8 boards, 2 at each corner, which make a corner.

You can see other several layers of words starting with the 1x3 on the inside and the different pallets layering outwards.

Here's what it looks like with the cooler inside. It's okay but the cooler would have to be raised in order for the lid to open freely when I the table surface. That wasn't a big deal, i just glued and nailed 2 additional 1x2's in the bottom to raise it up.

Next I used wood from another pallet to make the table surface. I wanted to use wider boards so that people could set drinks on it if they had to. Again this is why it's a good idea to spend a little more time being picky when selecting the pallets to use. Longer wood for the legs then wider boards for the table top.

After the surface was done I started to make the lid which would cover the cooler. Again I used wood from a different palette which all had the correct thickness and width.

I left a few inches gap at the back just to make sure it would open up without catching the cooler lid. Then I had to decide which direction to align the boards. I tested it with boards going horizontally.

And then I did it with the shorter boards going vertically.

I decided that the shorter vertical boards looked better. So I put some glue on their edges and nailed them in place.

This is with the lid built and just sitting on top. The 2 clamps are on there because the front board was a little warped and i was trying to get them to align flush with the edge boards while the glue was setting.

The finishing touches were to attach the bottle opener to one of the front legs.

And then I had to figure out how to attach the hinges. I never really came up with the correct way to do this. No matter what I tried it seemed like there was always a gap or else the lid would not open up correctly.

I figured it wasn't that big of a deal the rustic cooler was just to be outside. It turns out that there's a small half-inch gap at the back which tapers down flush in the front. But i doubt that anyone will notice.

After Karrie and i looked at it we decided that it wasn't very heavy and so wheels weren't necessary. But it would have to be shortened. Like i said earlier, i only made the legs 40" high at first because that's how long the boards were. I used a hand saw and cut the final height down to 36" high.

There was just 2 more things that needed to be done. First was a quick sanding. Nothing extensive, but i did use a belt sander on the surface to try and smooth that out since people will be putting drinks on it. The second thing i had to do was add two more boards in the bottom of the rack. The cooler was too low and the lid wasn't completely opening all the way. So these two 1x2's raised it up just enough.
.jpg "wood cooler stand, rack, water, leak")
The last thing was to find the right handle. One night Karrie and i went to Hobby Lobby and found these. It's actually a handle and bottle opener.
.jpg "old rustic handle and bottle opener, hobby lobby")
We really liked the look of the handle and for another dollar, just bought the bottle opener too. So attached the new handle and switched the original bottle opener i had with this one. And the cooler stand was done.
.jpg "easy to build cooler, pallet, wood, project")
Here's a closer look at the handle and opener. They tie in with the rustic look of the whole thing.
.jpg "free rustic pallet wood project, cooler stand")
Here's a view from the front with the lid open.
.jpg "simple cooler stand pallet")
One thing that i was worried about which turned out to be no problem at all was the lid. I was thinking about all different ways in which i could stop it from opening too much, but it just ended up stopping itself. You can sort of see from this picture that with the wood lid open it stops when it hits the wood top. Real simple and something that shouldn't break.
.jpg "plans for how to build wood cooler stand out of wood pallets free")
Overall i'm happy with how this turned out. Also it went pretty fast since the rustic look doesn't require tight joints and perfect cuts. Just my kind of project.

12 comments:
You wrote the instructions along with the pictures and you made it look so easy to build. Thank you very much for me as a rookie woodworker now I can start building. Thanks again...
Very cool! ����
Question: How about the drain? Do you have to lift the cooler out completely to empty it? Is there room to pull it out?
Well there is no solid bottom so i guess you could drain it while inside. But i usually just lift it out do drain it.
is there a way to have the top connect to open together?
Ya but you would have to cut the plastic hinges on the cooler. And we use the cooler for other things, not just with the stand.
looks great. i picked up a piece of plastic tube and an on/off valve to attach to the drain on the cooler. will see how looks when im done with tomorrow :)
Awesome idea and very cool looking cooler. One thing you said you worried about was the bottom supporting the weight of the cooler and the contents. One tiny adjustment that may give you tons more support would have been to put the horizontal 1x2's that support the cooler on top of the frame they are nailed to instead of gluing and nailing them to the bottom. Then they would have the entire structure supporting the cooler rather than just the nails and glue. NOT at all criticizing anything, just getting your input and opinion on it in case anyone else uses your instructions. I plan on making one from your plans, I love it and that will probably be the only change I would even consider. Thanks for the idea.
Great project. Thank you for sharing it.
I totally agree, not criticizing at all but I thought the same thing when I saw the pics. Great idea and I am definitely making it this spring.
Best tutorial I’ve seen so far. Great job. Thank you
Agree with Dave Estes comment. Also wondering if putting pallets on the underside would keep the elements from getting to the pine? And also giving underside more support? Thank you!
Post a Comment