Kite + Camera
Another use of CHDK that i wanted to try is KAP or Kite Aerial Photography. The simple explanation is just tying a camera to a kite and have it set to take pictures while it's flying. The complicated explanation involves big kites, heavy line, carbon fiber poles and pulleys.
My first attempt was to keep it simple. So when i was at Katie and John's a while back i bought an $8 kite from Harbor Freight. Then while watching the MSU vs UofM game i made a super simple case for the camera out of a bubble-wrap envelope.
The next day john, katie and i tried to fly it but it wasn't even windy enough to get the kite in the air, let alone the kite and the camera.

After reading some more i saw that people use huge kites to lift their cameras. I first thought of a Flow-form kite. Kind of like a para-sail, it doesn't require any struts or poles. I even saw that i could use a balloon.
To lift a pound i would need a helium balloon just bigger than 3 feet in diameter.
But the more i kept reading, the more i heard that the best kite to use for kite photography is the Rokkaku kite. It's supposedly easy to make, easy to fly and very stable. Stability is important because you want the camera to be as steady as possible so the pictures don't come out blurry.
I looked at the plans, it seemed easy enough, so i decided to make the 6 foot rokkaku kite.
Here's the extra strength nylon thread i used.
Here it is after i cut and laid everything out. I still had to sew it all down. I used rip-stop nylon for the material. It's lightweight and strong.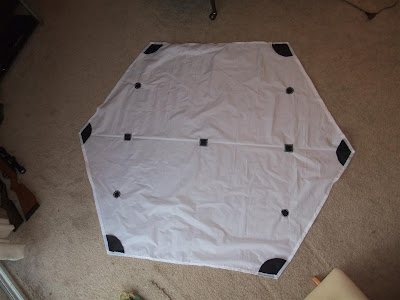
I first sewed the edge and the corner braces.
I screwed up a bit, they all got bunched up at the corners.
The squares turned out ok.
The circles were another story.
Then i punched the hole in the center and strengthened it with thread.
Here's the velcro strap to hold down the struts.
I was able to do 2 before i broke the needle on the sewing machine. Sewing by hand looked even worse. I kept saying to myself, it doesn't matter how it looks as long as it fly's.
But i eventually got everything on there.
For some reason the corners and the strap points didn't exactly line up. I'm still not sure why, but i think it's because i measured all of them from the edge 15 inches but then i folded the corner over 3/4 inch. I guess now i know that the 3 braces in the center should be different from the 2 corners. You can see how the corners don't really line up.
I then had to make the pockets for the fiberglass poles to lock into. They were a pain to make. The top ones have velcro and will fold over.
Here's what they look like when the velcro is attached.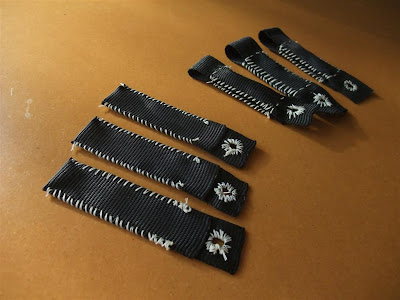
More crooked sewing when trying to sew them to the kite.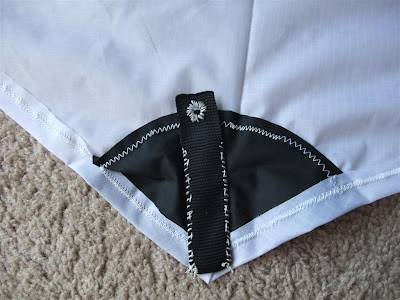
Lined up with the pole.
First the pole is slid through then it's folded over and held with velcro.
Here it is locked in.
The string is needed to create the bow in the pole.
I'm not sure if the fiberglass rods i'm using will work, they might be too heavy. They are solid fiberglass and they should be hollow tubes or carbon fiber.
Here's the strings pulled tight to create the bow in the poles. Adjusting the tension causes the kite to fly at different angles.
Also after the practice flight i realized that my reel wasn't going to work. It took too long to wind up all the line on the small spool.
The easiest thing that i saw was a simple piece of wood with handles. Here's the pattern i drew on AutoCAD then printed out on 11"x17" paper.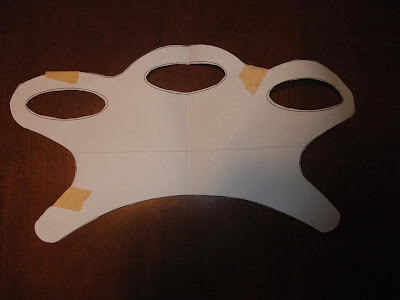
This is it after i rounded the corners with the router, sanded, stained and waxed.
The last things i had to do was to add a tail for stability and rig the 4 lines that attach to the kite string.
But... before i did that there was a super windy day in November. The wind was gusting up to 30mph. So i thought i could try a small airfoil kite.
I tied on the same bubble-wrap case i made before. It was so windy that the kite was able to lift the camera with no problem.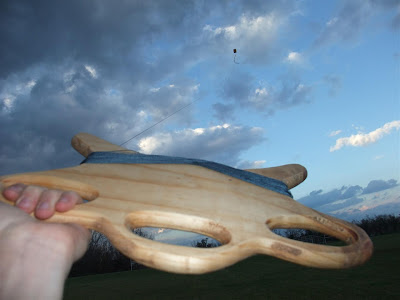

The wind was so strong that i thought the kite string was about to break. But i left it up around 200 feet for about 15 minutes. The camera was taking pictures every 5 seconds.
Now this is definitely not the way that kite photography is suppose to be done. It was too windy, the kite was too unstable, the camera rig was not level and it was too dark outside. But i just wanted to see how it would turn out.
Here's the typical picture i got. Out of 180 pictures, 95% of them looked like this, blurry and upside down.
Here's why they were so blurry.
But amazingly i got a couple of decent ones. That's me on the football field and my car in the parking lot.
The church parking lot next door.
You can see the kite string in this one.

It was a good learning experience for when i use my homemade kite. I'm going to try it on a day with steady calm winds, sunny sky and a better camera rig. We'll see how that goes.
My first attempt was to keep it simple. So when i was at Katie and John's a while back i bought an $8 kite from Harbor Freight. Then while watching the MSU vs UofM game i made a super simple case for the camera out of a bubble-wrap envelope.

The next day john, katie and i tried to fly it but it wasn't even windy enough to get the kite in the air, let alone the kite and the camera.

After reading some more i saw that people use huge kites to lift their cameras. I first thought of a Flow-form kite. Kind of like a para-sail, it doesn't require any struts or poles. I even saw that i could use a balloon.
To lift a pound i would need a helium balloon just bigger than 3 feet in diameter.

But the more i kept reading, the more i heard that the best kite to use for kite photography is the Rokkaku kite. It's supposedly easy to make, easy to fly and very stable. Stability is important because you want the camera to be as steady as possible so the pictures don't come out blurry.
I looked at the plans, it seemed easy enough, so i decided to make the 6 foot rokkaku kite.

Here's the extra strength nylon thread i used.

Here it is after i cut and laid everything out. I still had to sew it all down. I used rip-stop nylon for the material. It's lightweight and strong.

I first sewed the edge and the corner braces.

I screwed up a bit, they all got bunched up at the corners.

The squares turned out ok.

The circles were another story.

Then i punched the hole in the center and strengthened it with thread.

Here's the velcro strap to hold down the struts.

I was able to do 2 before i broke the needle on the sewing machine. Sewing by hand looked even worse. I kept saying to myself, it doesn't matter how it looks as long as it fly's.

But i eventually got everything on there.

For some reason the corners and the strap points didn't exactly line up. I'm still not sure why, but i think it's because i measured all of them from the edge 15 inches but then i folded the corner over 3/4 inch. I guess now i know that the 3 braces in the center should be different from the 2 corners. You can see how the corners don't really line up.

I then had to make the pockets for the fiberglass poles to lock into. They were a pain to make. The top ones have velcro and will fold over.

Here's what they look like when the velcro is attached.

More crooked sewing when trying to sew them to the kite.

Lined up with the pole.

First the pole is slid through then it's folded over and held with velcro.

Here it is locked in.

The string is needed to create the bow in the pole.

I'm not sure if the fiberglass rods i'm using will work, they might be too heavy. They are solid fiberglass and they should be hollow tubes or carbon fiber.

Here's the strings pulled tight to create the bow in the poles. Adjusting the tension causes the kite to fly at different angles.

Also after the practice flight i realized that my reel wasn't going to work. It took too long to wind up all the line on the small spool.

The easiest thing that i saw was a simple piece of wood with handles. Here's the pattern i drew on AutoCAD then printed out on 11"x17" paper.

This is it after i rounded the corners with the router, sanded, stained and waxed.

The last things i had to do was to add a tail for stability and rig the 4 lines that attach to the kite string.
But... before i did that there was a super windy day in November. The wind was gusting up to 30mph. So i thought i could try a small airfoil kite.
I tied on the same bubble-wrap case i made before. It was so windy that the kite was able to lift the camera with no problem.


The wind was so strong that i thought the kite string was about to break. But i left it up around 200 feet for about 15 minutes. The camera was taking pictures every 5 seconds.
Now this is definitely not the way that kite photography is suppose to be done. It was too windy, the kite was too unstable, the camera rig was not level and it was too dark outside. But i just wanted to see how it would turn out.
Here's the typical picture i got. Out of 180 pictures, 95% of them looked like this, blurry and upside down.

Here's why they were so blurry.
But amazingly i got a couple of decent ones. That's me on the football field and my car in the parking lot.

The church parking lot next door.

You can see the kite string in this one.


It was a good learning experience for when i use my homemade kite. I'm going to try it on a day with steady calm winds, sunny sky and a better camera rig. We'll see how that goes.


1 comment:
I like what you did Bro Iwil try to do the same Kiting what fun man!
feeling like a child! doing this!
Post a Comment