11/30/2011

Final Flight

After getting the flowform kite to fly with the camera i was almost ready for my homemade kite to give it a try. Here's the link from the earlier kite making.
I did the last bit of finishing touches to the kite
, mainly the bridle. Then i had to make a better, steadier, harness for the camera. The thing to use is called a picavet. It is a harness and bracket that ensures that the camera is always level, no matter what angle the string is at.picavet gif, level camera, KAP

This was my first attempt. I used light aluminum box tubing and pvc tubes instead of pulleys. It was pretty light, but i didn't like it.DIY, homemade picavet, aluminum
So next i made this out of a thick wire hanger. Simple and strong.
new picavet, diy, make, wire hanger

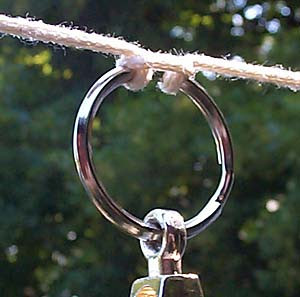
Someone online said that they attach it to the kite string using a simple metal o-ring. It loops over the line and seemed like a good idea. I didn't have an o-ring so i used copper washers.
KAP, kite aerial photography, o-ring

I first tried the Rokkaku kite, but it was way too windy and it didn't fly at all. The kite kept zig-zagging back and forth. So i used the flow-form kite that flew before when the wind was really blowing hard.
Again it went right up with the camera. Photo from my kite and 200 feet, KAP, kite aerial photography
This time i was in the park down the street.
kap photography, canon camera, CHDK intervalometer
That's 15 mile road at the top.
canon camera, CHDK, intervalometer, up in the air
aerial view of houses, taken with a camera and kite
Notice the sidewalk down there...
falling camera, from a kite, broken camera
Well i guess the saying is "you can't make an omelet without cracking some eggs."

smashed canon camera after falling from kite
Just as i started pulling the kite in the string snapped and it fell to the only area of pavement, of course, the bike path.
The problem was that the washers used had too sharp of edges and after 20 minutes the kite string snapped.

metal washers snapped line of kite

The
kite floated away, even after an hour of looking for it i never saw it again. I'm pretty sure it landed in someones backyard on the other side of the woods.

Since the camera was totally broken i decided to just take it apart and see how it's made.
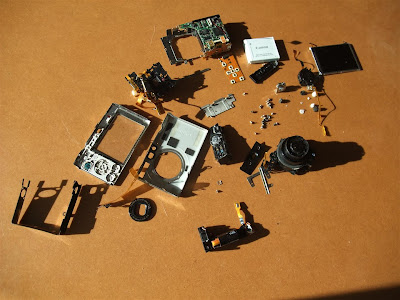
disassembled SD770is canon camera
disassembled SD770is canon camera, all pieces, parts
I plan on getting another used or new Canon camera and making another flow-form kite.
It's a bummer, but i've needed a different camera for a while. That one had so many things wrong with it:
  • broken battery door
  • dirt inside lens
  • missing lens cover
but it always worked and was great for doing these CHDK projects.


PhotoFly 3D_30

I read in a magazine about Autodesk Photofly 2.0. It's a free program from the same company that does AutoCAD, which is the software that i use at work.

The way it works is that you take lots of pictures of something from all different angles, then upload it to Autodesk and it creates a 3D image.

The hard part is taking all the pictures. The easy part is that once you are done you just upload them and the program does the rest. Well sort of, the first time i tried it, it said that i didn't have enough images to create a 3D image. And the program crashes a lot.

My first try was an old fishing reel. I took about 40 pictures, but apparently that wasn't enough.

The next try i took a bunch of pictures of the clay ocarina i made. It didn't come out right but at least it sort of worked.


Here's "part" of my car in the driveway.


Obviously it's not perfect but it's still kind of cool.

11/16/2011

Moneyball

Karrie and i saw Moneyball the other night. It was a great movie.

It's based on the true story of the Oakland Athletics trying to compete in baseball with only a fraction of the payroll of teams like the New York Yankees.

Brad Pitt was the general manager that realized that he could not compete by doing the same thing the other teams were doing.
Brad Pitt stars in Moneyball as Billy Bean, Oakland Athletics GM
Jonah Hill played the guy that majored in economics and calculated the players with the most value.
Jonah Hill stars in Moneyball, movie, with brad pitt, funny guy
It showed cool inside meetings of how players were traded to different teams.
Brad Pitt and Jonah Hill stars in Moneyball, movie, great together
It was a little slow at times but overall really interesting and funny.
Thumbs Up Rating

11/10/2011

Kite + Camera

Another use of CHDK that i wanted to try is KAP or Kite Aerial Photography. The simple explanation is just tying a camera to a kite and have it set to take pictures while it's flying. The complicated explanation involves big kites, heavy line, carbon fiber poles and pulleys.

My first attempt was to keep it simple. So when i was at Katie and John's a while back i bought an $8 kite from Harbor Freight. Then while watching the MSU vs UofM game i made a super simple case for the camera out of a bubble-wrap envelope.
DIY case for camera out of Tyvek and bubble wrap
The next day john, katie and i tried to fly it but it wasn't even windy enough to get the kite in the air, let alone the kite and the camera.

Testing out the kite for KAP aerial photography
After reading some more i saw that people use huge kites to lift their cameras.
I first thought of a Flow-form kite. Kind of like a para-sail, it doesn't require any struts or poles. I even saw that i could use a balloon.

To lift a pound i would need a helium balloon just bigger than 3 feet in diameter.
How much will a balloon lift

But the more i kept reading, the more i heard that the best kite to use for kite photography is the Rokkaku kite. It's supposedly easy to make, easy to fly and very stable.
Stability is important because you want the camera to be as steady as possible so the pictures don't come out blurry.

I looked at the plans, it seemed easy enough, so i decided to make the 6 foot rokkaku kite.
Rokkaku kite dimensions, plan, inches
Here's the extra strength nylon thread i used.
Extra Strength Nylon Thread, spool
Here it is after i cut and laid everything out. I still had to sew it all down. I used rip-stop nylon for the material. It's lightweight and strong.
Rip stop nylon material for kite, kap, aerial photography, rokkaku
I first sewed the edge and the corner braces.
sewing the kite corners, nylon, braces
I screwed up a bit, they all got bunched up at the corners.
sewing the kite corners, nylon, braces, zig-zag
The squares turned out ok.
sewing the kite corners, nylon, braces, zig-zag, gussets
The circles were another story.
circle, sewing the kite corners, nylon, braces, zig-zag, gussets
Then i punched the hole in the center and strengthened it with thread.
circle with hole, sewing the kite corners, nylon, braces, zig-zag, gussets
Here's the velcro strap to hold down the struts.
velcro strap for kite, make, sew
I was able to do 2 before i broke the needle on the sewing machine. Sewing by hand looked even worse. I kept saying to myself, it doesn't matter how it looks as long as it fly's.
velcro strap for kite, make, sew by hand
But i eventually got everything on there.
rokkaku kite, nylon, kap, kite aerial photography
For some reason the corners and the strap points didn't exactly line up. I'm still not sure why, but i think it's because i measured all of them from the edge 15 inches but then i folded the corner over 3/4 inch. I guess now i know that the 3 braces in the center should be different from the 2 corners. You can see how the corners don't really line up.
rokkaku kite, nylon, kap, kite aerial photography
I then had to make the pockets for the fiberglass poles to lock into. They were a pain to make. The top ones have velcro and will fold over. kite strap nylon braces, pole holder
Here's what they look like when the velcro is attached.
hand sew kite brace, nylon
More crooked sewing when trying to sew them to the kite. learn to sew a kite, brace
Lined up with the pole.
learn to sew a kite, brace with the pole
First the pole is slid through then it's folded over and held with velcro.
learn to sew a kite, brace with the fiberglass pole
Here it is locked in.
how to sew a rokkaku kite, brace, corner, nylon, fiberglass pole, rod
The string is needed to create the bow in the pole.
kite tension string, fiberglass pole
I'm not sure if the fiberglass rods i'm using will work, they might be too heavy. They are solid fiberglass and they should be hollow tubes or carbon fiber.
assembled rokkaku kite, ready to fly
Here's the strings pulled tight to create the bow in the poles. Adjusting the tension causes the kite to fly at different angles.
tension on the fiberglass rod for kite
Also after the practice flight i realized that my reel wasn't going to work. It took too long to wind up all the line on the small spool.
homemade kite spool, wood
The easiest thing that i saw was a simple piece of wood with handles. Here's the pattern i drew on AutoCAD then printed out on 11"x17" paper.
wood string spool for kite pattern, autocad
This is it after i rounded the corners with the router, sanded, stained and waxed.
wood string spool for kite pattern, with string
The last things i had to do was to add a tail for stability and rig the 4 lines that attach to the kite string.


But... before i did that there was a super windy day in November. The wind was gusting up to 30mph. So i thought i could try a small airfoil kite.

I tied on the same bubble-wrap case i made before. It was so windy that the kite was able to lift the camera with no problem.
view of parafoil kite, kap
kap, camera and parafoil kite, CHDK, intervalometer
The wind was so strong that i thought the kite string was about to break. But i left it up around 200 feet for about 15 minutes. The camera was taking pictures every 5 seconds.

Now this is definitely not the way that kite photography is suppose to be done. It was too windy, the kite was too unstable, the camera rig was not level and it was too dark outside. But i just wanted to see how it would turn out.

Here's the typical picture i got. Out of 180 pictures, 95% of them looked like this, blurry and upside down.
blurry kap photo, aerial photo
Here's why they were so blurry.


But amazingly i got a couple of decent ones. That's me on the football field and my car in the parking lot.
kap, aerial photo from a kite
The church parking lot next door.
kap, aerial photo from a kite
You can see the kite string in this one.
how to take pictures with a kite
aerial kite picture
It was a good learning experience for when i use my homemade kite. I'm going to try it on a day with steady calm winds, sunny sky and a better camera rig. We'll see how that goes.