8/22/2019
7/19/2019
6/24/2019
How to Change a Miter Saw Blade | Dewalt
This is shown for the 12" DeWalt miter saw but is similar with any miter saw you have.
Conveniently the DeWalt saw provides the screw and socket needed to change the blade. It is on the left part of the saw behind the fence.
The first step is to unplug the saw.
Then you need to move the blade guard out of the way. This involves loosening this screw.
You need to be able to access this Reverse-Thread bolt that hold the blade in.
You can see that after the screw is loose, the guard can be moved up and have access to the bolt.
You also must push in the blade lock button so that the blade doesn't spin while you try to loosen it.
Here you can see that the loosened screw can hold the blade guard up and won't fall down.
Remember the bolt is reverse thread.
Just hold in the lock button and remove the bolt and collar.
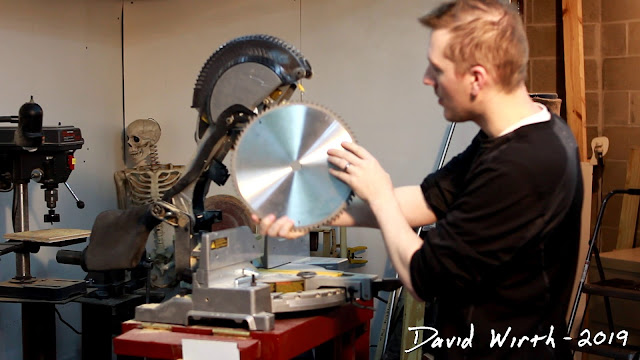
When reinstalling the blade, remember that the teeth curl down over the front.
Video Transcript:
so the only tool you need to change the
blade on the DeWalt miter saw is
actually located right here with the
tool that's behind the rest it's a
two-in-one socket and star bit it's step
one is to unplug it make sure you unplug
the tool you don't want to be working on
it next time we hit it step two is to
lift the blade guard up and out of the
way it should lock you can get a little
pushing it'll lock in place like that
now you all you have to do is first undo
this one screw which will allow you to
push the blade guard out of the way and
loosen the blade so use the star bit end
so if you loosen that nut up about 1/2
inch this blade even if it falls it will
hit on that screw and it won't come down
next you lift the blade guard in the
middle there's the metal plate and you
push that up and out of the way and that
gives you access to the center nut here
you can see the nut that's loosened up
enough so it hits the blade guard and
stops it from falling down then you take
this metal plate push it up out of the
way and gives you access to that knife
so now with the blade guard out of the
way you push in on the other side
there's a black button right under the
trigger rotate the blade till it locks
in like that and now the blades locked
in and written right here on the side it
says loosen with an arrow going in the
other direction it's a reverse the red
nut so you have the blade lock use the
socket end and you rotate it reverse the
red bull the arbor and the blade comes
right off so here's the new blade I'm
putting on it's actually an 8
12-inch blade and when this is off I'm
going to sharpen it to get a little dull
so when putting on the new blade make
sure you have the rotation correctly it
says here rotation and actually the the
writing on this one is on the outside
and the teeth cut down the writing on
this new blade is actually on the other
side and you want the teeth cutting
downward and I'm the newly installed
blade make sure the teeth are pointing
down because that's the rotation of the
cut put the armor back on and then tighten
the nut remember it's the opposite
direction you're actually loosening it
when you get it snug DUP push in the
black button again to lock the blade and
you might notice when you push in the
button the blade actually rotates a
little but the arbor is locked you're
not actually locking the blade you're
lacking this Arbor and then it is
loosened to tighten now you can lower
the metal blade guard tighten it up and
you're all set ready to cut
Extension Cord Reel - Easy Build Plans
I am continuously trying to improve my basement shop. Whether it's with new tools:
-table saw
-miter saw
-homemade disc sander
Or whether it's with things i build to help organize:
-nail gun case
-organizer cart
The next thing that i've noticed to be a problem is a convenient extension cord. In the past every time i needed to plug something in i had to take down the orange extension cord from the peg board, unwind it, and plug it in. Then when i'm done with the tool i need to rewrap it and hang it on the board. It was a pain.
Last Christmas i got an extension cord that attaches to the ceiling in the garage. It's spring loaded and will automatically reel back up into its housing. I use it all the time in the garage.
The one in the garage cost around $40 and is quite big. I didn't really feel like buying one and if i hung that from the ceiling in the basement i would constantly be hitting my head on it. I wasn't 100% sure where i even wanted to mount it in the basement. The ceiling was convenient in the garage, but perhaps on the wall or under the workbench would be better for the basement.
So i started with some sketches on paper as usual.
I quickly realized that the complicated part of the reel is winding up a cord and not having the plugged in end become all twisted. I'm guessing that with the store bought extension cord reels there is some sort of fancy roller bearing mechanism that can rotate without becoming twisted.
Eventually i came up with a design that involved the plugged in end of the cord to come out the center of the reel. I still wasn't super comfortable with the design, but i thought it would work well enough.
I decided to make the 'wheels' out of OSB, a material that i have used a lot recently. I built the nail gun case and cart organizer out of that type of wood.
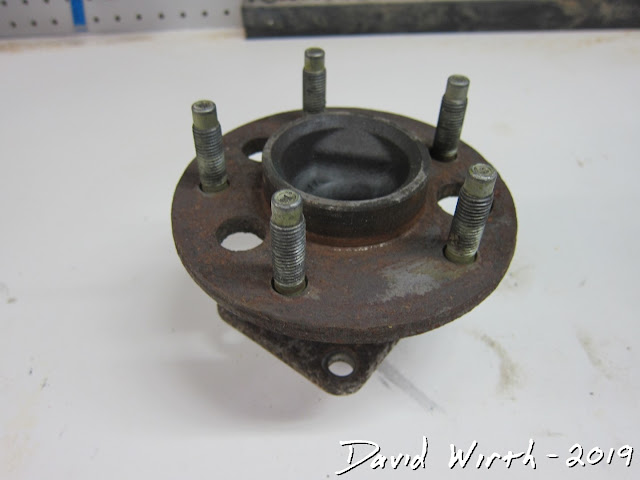
For the spinning/rotor part of the reel i used something i just had lying around, the old hub from my car. A week earlier i replaced one of the rear hubs off my Pontiac Grand Prix.
The old one wasn't broken, just the ABS sensor was cracked. It was a little overkill but i thought it would work. If it can hold up 1/4 of a 2000 lb car, it should be able to hold up a 4 lb extension cord.
For the center of the reel i wanted to use a short piece of PVC pipe. A 3" diameter pipe was perfect, and i was able to drill a large hole in it for the extension cord to pass through. The only difficult part was in how i was going to attach it to the wood.
But here's all the materials i needed set out. I also wanted to use a scrap piece of 2"x6" pine for the mount. Something that i could bolt to the hub and screw to whatever i was going to hang it off of.
I started by cutting out the 2 circular ends of the reel. Also i decided that cutting some holes in the ends would be functional for a couple of reasons. Mainly it would provide a type of handle for me to spin the reel. I couldn't really attach a handle, your arm would hit the end of the extension cord coming out of the center of the reel. But by adding holes it gave me something to grab onto.
Mount PVC to wood with mechanical rivets.
I rounded over the wheels and the cut-out holes with the router. Just a simple round-over bit to remove the sharp edges.
Next i measured, marked and drilled out the holes to attach the hub.
At this point i still wasn't sure how i was going to attach the PVC center piece to the wood ends. Ultimately i decided to make some small metal 90degree brackets and rivet them together. I'm still not happy with how that part turned out, but i still have no better way of connecting them.
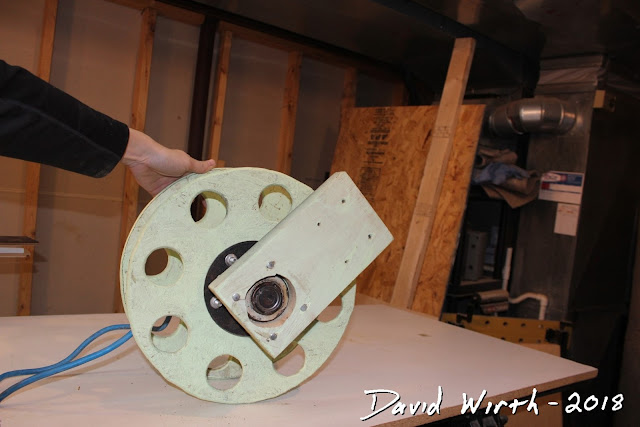
In order for the hub to fit flush with the 2x6 i had to cut out a circular section. Then i drilled 4 holes to attach them together with bolts. With everything bolted together it seemed like it would work ok. Although the steel hub made it overly heavy.
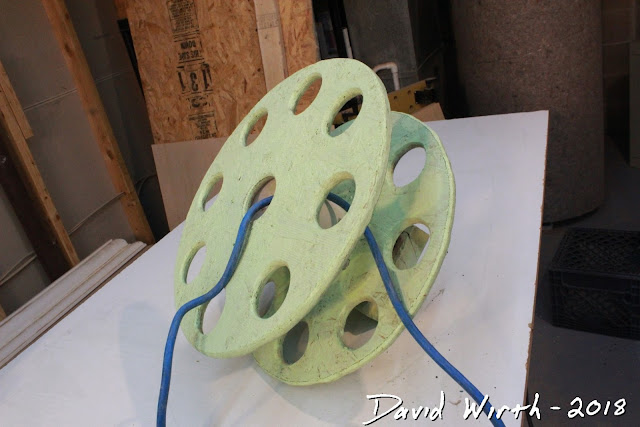
When i plugged it into the ceiling power strip it seemed like it would work fine. But as i started winding the cord onto the reel i realized that there might be a problem. The cord really started to become twisted at the plugged in end. I would have to leave plenty of slack at that end and hope that the constant twisting and untwisting wouldn't damage the wire.
So i stood it back off the ceiling to do the finishing touches. I sanded everything down with the belt sander and palm sander. Then i put 2 coats of some old paint i had lying around and 2 coats of polyurethane.
It was kind of obvious that i didn't need to make the reels that large. I probably could wrap 200 feet of extension cord on the thing. But i only needed around 20 feet. If i had to make another one i would have made the reels a lot smaller.
Just another piece of the puzzle in making the shop easier to work in.
Video Transcript:
so something I made for my workshop a
bunch of years ago and never really
showed anybody how he made it is this is
an extension cord reel and the reason I
never really showed anybody how I did it
was because I never felt like it was
quite done it it works but it's not
perfect it's good for a small shop not
for a big one and I was looking for
something that I could just reel out
like in the garage I have a reel from
the top that I cranked up and cranked
down what's coming up with different
ideas of pipes and wheel bearings and
just last week I changed the rear hub on
the back wheel of my car and this is the
old one and it's spins pretty easily
it's really heavy really heavy duty I
have a quick sketch and I'm just gonna
make it out of oh s bead particle board
because that's what I have lying around
and we'll see how it goes well the first
step is determining how big to make the
circle and this is just scrap I have
lying around that's 16 inches so I'm
think I'm gonna make it 15 and a half
just so I have screw into that center hole and I can
leave that bit right in there so I'm
going to take a sharpie up and draw this
circle it'll hold it right in place and
this will be the 15 and a half inch
circle nose close that I'm going to use
all right there's a the layout lines that I did on the piece
that will attach to the hub this die
outer diameter is this here I'm gonna
cut that out and I just kind of
eyeballed right angles and drew this
pizza shape with the lines here
okay because I'm using such a large bit
it's binding up a little but that gave
me a hint on what I should be doing and
that's drilling halfway through with one
and because the bit sticks out a little
bit the holes are on the other side so I
can cut it from the backside and I won't
get any tear out as you can see from
these holes because I'm coming at it
from both directions that's all the way
through nice clean hole a bit and that's
that and obviously so I don't have to
remeasure redraw anything I'm just using
a sharpie and tracing all the holes that
I already drilled out it's the center
section cut out and I just need to drill
these holes and it will fit right over
that now real quick way that I transferred
the marks from here onto this board I
took a big sharpie and I marked up the
ends of these and I set it on there I
lined it with that center hole and it
took a hammer and when I hit it just
gave faint impressions on here that I
can mark for the holes to be drilled out
and I got five of them alright I just
got done cutting out the holes for the
hub bolts I used a half inch bit and I
had to do it on the drill because the
drill press doesn't have enough of a
reach I was going this will beat the
back and how it will mount to the wall
and then this piece would fit on the
front okay here's the piece of PVC I just cut
out it fits in the center of the hub I'm
gonna mount this here and before I do
that I have to drill a hole in the
center of this PVC so that a cord can go
through come out and come out the front
because that's where I'm going to
connect it it's not a great design I
would have liked to somehow fit the cord
out the back but with this hub there's nowhere to go
and it has to come out of the center
somewhere that way when you wind it up
the inner part doesn't get tangled only
the outer part winds up and just to
knock down some of these sharp edges I'm
using a roundover bit on the router
I had cut out the wheels before I'm the
inner piece with the hole in the middle
where the court is gonna feed through
and out the front but I wasn't sure how
I was gonna attach the wood wheels to
the PVC Center axle and I thought about
it and I came up with just making a
whole bunch of small little right angles
out of steel and then riveting them to
the wood and to the PVC I was thinking
about making out rings and screwing it
together and bolting it together this
just seemed like the the most stable
secure way and then on the back I bolted
the back of the wheel axle to 2x6 which
I will attach to the wall
once again I'm going to feed the
extension cord through the center aisle
at the front that's where it's gonna
plug in and I'll still be able to wind
it up I ended up hanging it from the
ceiling I'm just test fitting it right now I
just have a couple bolts I'm gonna take
it down and sand it and everything but
one bit of a design flaw that I saw was
that this Court is gonna get all twisted
up because it is even though it's
passing through it's gonna be spinning
so I don't know how I'm gonna fix it you
can see it's getting all twisted up here
now it is working for you know I'm never
gonna need to take out more than 2
or so but I'm gonna have to think about
that so I'm happy with where it is on
the ceiling it's high enough up I'm not
gonna hit it but I'm gonna have to worry
about this cord twisting out so far it's
working pretty well I built it because
the cheapest extension cord reel you can
get is probably around 5
one at Harbor Freight the 2
footer it's like 5 isn't cheap but then again
extension cords aren't that cheap
hopefully you can get an old extension
cord and use that the heart of this unit
is an old car hub a wheel bearing right
here out of an old car I changed it on
my Grand Prix and I used this wheel
bearing you don't need something this
heavy duty but this is definitely robust
enough to hold up 2 top of that this this is the mount that
I mount to the joists and the reel
itself is just OSB particle board and a
piece of PVC pipe in the center now the
real reason when I say it's not quite
done it's not quite perfect I'm an
extension cord really you have the one
part of the cord that doesn't move and
the other part that unwinds and
somewhere in that unit there's a 36
swivel that allows electricity flow
through but it doesn't tangle the court
and that's the part I could never really
get over and figure out so when I unroll
this and it unrolls like this part of
this court kind of tank
goes up which is why this is only really
good for about 2 have a 25 foot cord on here and that's
all I really want to use because
otherwise it's just going to tangle up
you'll see when I mounted on the ceiling
but at the center of this this is where
the cord comes out of the middle I
actually have a hole cut in this PVC
pipe which is where this wire feeds
through and you can see as I unwind it
it's actually twisting this cord in the
middle that's it over so to mount the
PVC to the particle board I just used
some metal tabs and I riveted them in
and that's how it's fine and to transfer
the court from the reel off the reel I
drilled a hole in this PVC and it comes
out here so it's still tangling up but
hopefully in just one direction and it
has I'm sure it's maybe shorten the life
of the court but there's no real damage
to it it's just twist it up a little so
let's mount it to joists I'm gonna have
you want to find a spot obviously in the
shop that's in the middle that you can
reach it I use this for the table saw
it's a nice thick extension cord
probably like 12 gauge so it's enough to
handle a big tool I'm gonna mount it to
a joist and then I'll show you how it
winds up and it works so to mount it I
took this bracket off just four bolts
holding it on and I'm just using four
screws now I can lift this up into place
so here it is all mounted in place ready
to go you can see the mount on the
joists I bolted it down here and it's
all wound up and to uh to use it you
just pull the pull the cord down it
unrolls and then to wind it up you just
grab one of the handles and roll it up
now you might be thinking where am I
gonna plug it in well that's where that
lightbulb and all of this comes into
play I'm actually going to install an
outlet box where that light is and move that
down somewhere over here so I'm gonna
have to drill through a bunch of these
joists run a wire put in an outlet box
so I'm going to do that next
well it was just a couple seconds for
you but it took me an hour
a little bit more to replace that light
with an outlet box and move the light
down there but it's all hooked up now
this is connected you can see this is
the extension cord that comes out of the
middle and when I pull it this gets all
twisted up so when I pull the extension
cord down this gets all twisted up and
we have to have a spot for this to be
loose and become twisted so you can have
a hook or something it's always ready to
go it's always plugged in it's out of
the way when you don't need it I use it
all the time I use it for my table saw
which is in the middle of the room any
jig side just pull it down use it wind
it back up it's definitely great to have
in a shop like this and it works great
for a small shop we only need 5 1
at a time you don't need 5
of your garage door or something so if
you have an old car hub or if you have a
junkyard nearby you can use that if not
you can use any small wheel bearing this
isn't much weight but the hub is
definitely I mean I think I could hang
from this thing and it wouldn't go
anywhere that's how solid the hub is so
let me know what you think hopefully you
like it let me know if you have an idea
for how to get that swivel so I don't
get that cord twisting up like this there's got to be
some sort of swivel out there that will
allow that I've never found it though so
let me know what you think
Adjust Bandsaw | Drift, Resaw, Blade Guides, Tension, Sharpening
I own a small plastic 9" delta bandsaw. It has always been poor at cutting a straight line and forget about resawing.
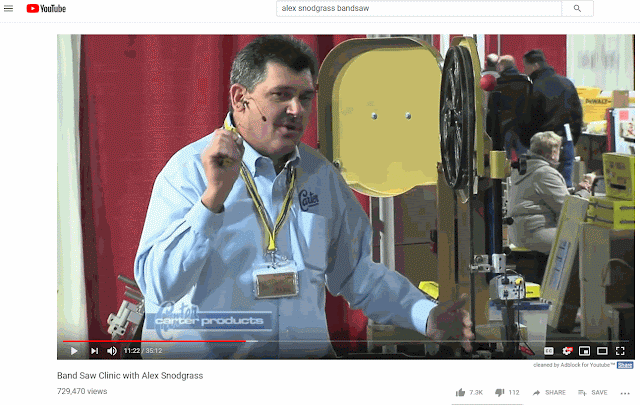
Then i saw a video by Alex Snodgrass and decided to give the saw adjustments another try.
First thing was to sharpen the blade. I bought a cheap $9 rotary tool from Harbor Freight, and used the carbide disc to sharpen all of the teeth on the blade.
I feel like this made a huge difference, less cutting pressure was needed.
The next thing was to adjust the upper and lower blade guides. They should be close but not touching.
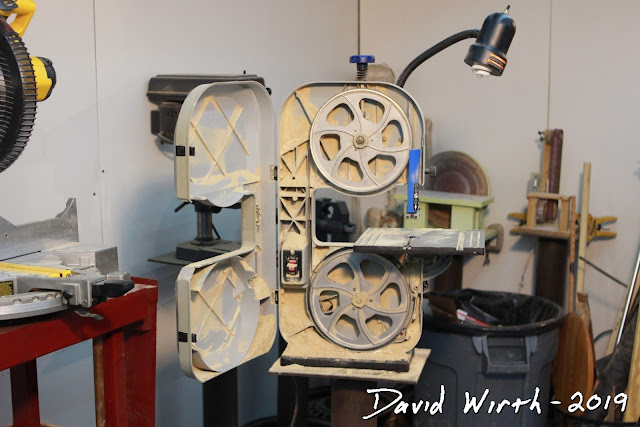
The second big difference was the picture below. The blade doesn't need to be centered on the wheel...the gullet of the teeth need to be at the center and supported.
Another view of the upper blade guides.
The lower wheel doesn't matter. The blade just needs to be somewhere in the center.
And again with the lower blade guides. Guides and bearing need to be close but not touching.
Video Transcript:
for years I had issues with this little
Delta bad side never cut while I was
always struggling with the cuts and I
recently got it set up so it cuts
perfectly on so let me show you how I
set it up and the things I learned most
were from YouTube by a guy named Alex
Snodgrass it's probably one of the
suggested videos over here it's 35
minutes long I suggest you watch it but
here are the quick things that I learned
and how I got this set up so before you
do anything make sure it's unplugged so
you can work on it without fear of
hitting the switch there's just a few
things you have to setup but the biggest
thing the number one thing I learned was
the blade on the wheel I was getting
lots of drift it was always drifting off
line when I was trying to resaw cuts and
the biggest thing I learned from that
video was you you Ness not necessarily
want the blade in the center of the
wheel you want the gullet of the teeth
in the center of the wheel and his point
was just because the blades in the
center of the wheel the teeth might be
unsupported and that's why you're
getting drift on the blade so the setup
I have now is the gullet of the teeth so
where the teeth come to the point and
then curl around that deep the deepest
part of that curl should be in the
center of the wheel I think that made
the biggest difference so right here
this is the top wheel and you can see
that that blade is not centered but the
gullet of the center the teeth are
centered on the blade I used to have
this blade shift that over way over to
the left and now it's supported the
teeth are supported and it cuts much
better and you can see on the bottom
that's totally different the teeth are
off the front so I was always concerned
about getting these two coplanar and
getting them aligned he said as long as
the on the top wheel the teeth the
gullet of the teeth are centered on that
wheel that's all you need and that has
made the biggest difference the next
thing I did was sharpen the blade I've
been using an old dull blade so I went
through I got a little the nine dollar
sharpener from Harbor Freight and I just
went through and touched the blade
sharpen it up I think that made a big
difference next the adjustments
and this saw has the little allen wrench
right there on the side you can remove
this blade yard now the adjustments on
the set the two side adjustments
typically there's a type of friction
material or a little two bearings this
has the little friction blocks on the
side they want to be just not touching
maybe a sixteenth of an inch they're
just there in case the blade gets off
track so not a huge amount of adjustment
on the top or bottom of the side
adjustment adjusters that's not very
critical on the back there's a wheel
bearing on the back of the blade that he
said take take a lot of time adjusting
that it shouldn't be touching it should
be as close as you can get it without
touching so you don't need an eighth of
an inch sixteenth of an inch as close as
you can get that back wheel without
touching that's where you set it on the
top and the bottom so here are the
guides and I've tried to get this as
close as I can without touching the
blade this back guide and on the front
these don't have to be exact just as
close to supporting the blade as you can
and the last thing he said was
tensioning of the blade no some people
say oh you should pluck it and hear a
note should be this note it should be
that note his suggestion was just tap it
with your finger on the side and it
should deflect an eighth of an inch so
it doesn't matter how big your saw blade
is what type of blade it is then we'll
just tap it on the side thanks about
here you just tap it real lightly and it
should deflect an eighth of an inch and
that's how you get the tension and
here's what he meant when he said
adjusting you're just tapping the side
of the blade and it should deflect an
eighth of an inch it doesn't matter what
size blade you have what's I saw you
have just tap it on the side and it
should deflect an eighth of an inch
so those things sharpening the blade
centering the the gullet on the wheel
the adjusters on the blade guides
and the tension this is I was cutting it
better than it ever has and I think the
main thing though that I learned was
getting that the blade centered getting
the gullet centered and critically on
the top you're not concerned about the
bottom really you don't care about the
bottom it doesn't have they don't have
to be coplanar they don't have to be
aligned as long as you are centered on
the gullet on the top so it's actually
off the the teeth are a little bit off
the wheel on the bottom so it's cutting
great because I'm a top here it's in the
center the teeth are supported and
they're not flexing offline so those are
the things I learned after you watch
this video I suggest watching his video
over here on the left it's 35 minutes
but it's super good and he tells you
tons of ton of stuff about bandsaw and
cutting but I hope this helped I hope
this was a quick lesson on getting rid
of drift and getting it cuts on a
bandsaw even a cheap bone like this
Extension Cord Holders
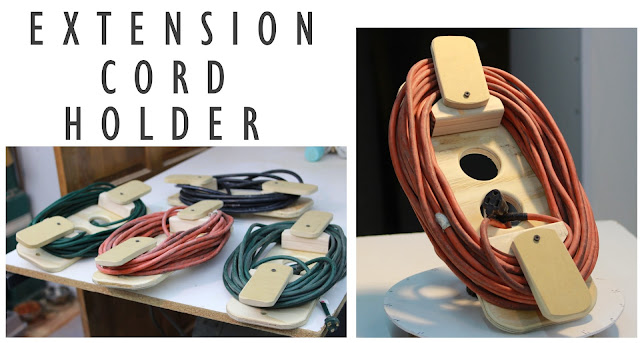
Extension Cord Holder
Simple hinged extension cord holder
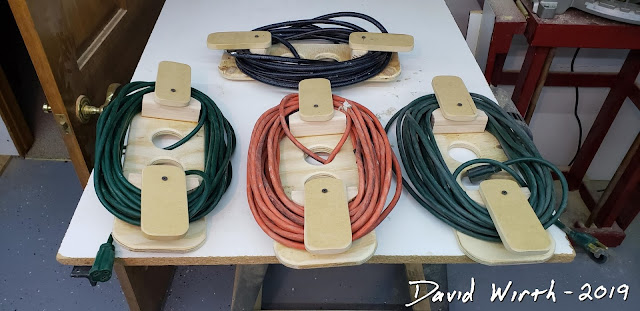
Thought i might as well make several for the extension cords i have
Here's an example of a single board extension cord holder.
These are ok, but take time to unwind and make pinch points at the ends.
Another 1-piece design.
This was a string holder i made for my kite string. This did work well because the idea is to slowly let out the line.
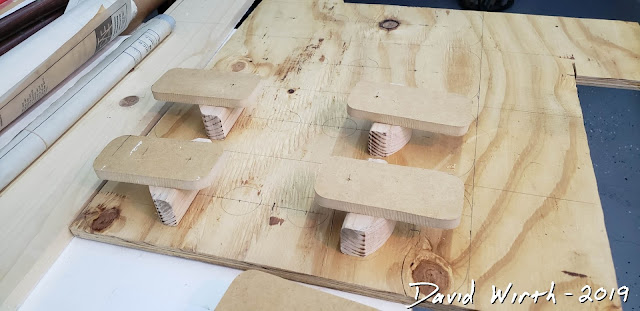
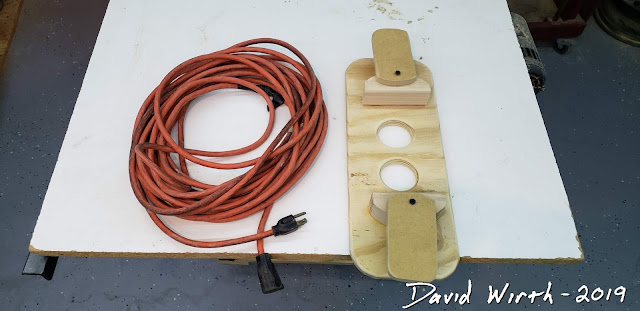
The initial setup so i could see what size board would fit on the scrap plywood i had.
After the board was cut out, i rounded the edges over.
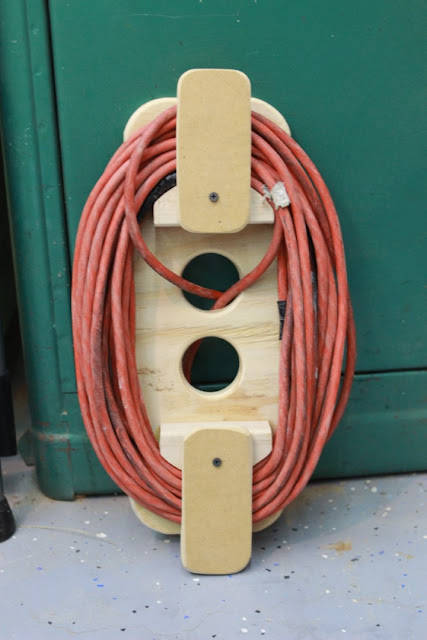
The first test of wrapping the cord.
The circle cut-outs are nice for hanging and securing the cord through.
All of the cords wound up.
And quickly removed from the screw-hing ends.
Another view.
Compact design.
One thing i would have changed was instead of using a drywall screw, used something else stronger and won't come loose.
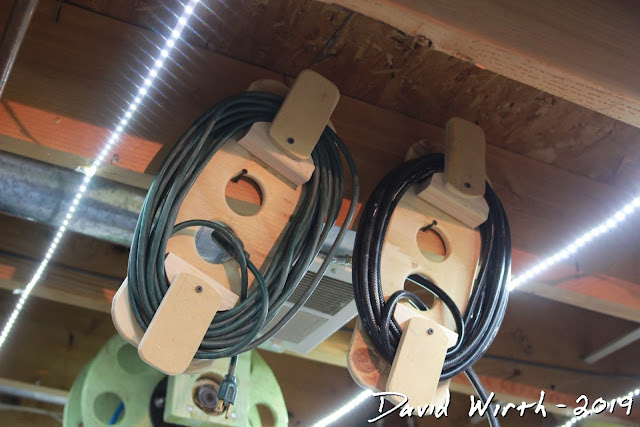
And here they are hanging on the ceiling joists in the workshop.
Transcript from Video:
I just got done building these wooden
extension cord holders and I wanted to
explain why I think they're better than
the typical ones out there so most of
the time if you're going to build a wood
extension cord holder you just take a
piece of plywood cut a couple of use in
it and you just wrap the cord around it
you might have a handle on the side
there's two things wrong with that one
is you're making a pinch point with the
cord because you're wrapping it around
that tight radius and two when you want
to get two extension cord off the holder
you have to unwrap the whole thing wrap
it back off the holder and with these it
solves two of those problems one is the
tight radius I put a it's just a piece
of plywood a couple holes in it to hang
it up and hold the cords off the back
and 2x4 that I cut an arc and that will
make sure that there's not a tight
radius where it can wear the cord down
when it's being held on there and that's
the real trick I can swivel this MDF
down and pull the whole extension cord
off in one thing I don't have to unwrap
the whole thing so again it's on there
but I can get it off in one second by
just pulling it right off the piece of
wood in the front swivels out of the way
and I can get the whole cord off instead
of unwrapping the whole thing like you
traditionally would I'm just a piece of
plywood so it's nothing revolutionary
but it's just a lot easier than having
to go through wrapping it and you're not
making tight pitch points on the cord
when you're wrapping it around a piece
of plywood so again it was free it took
about an hour to make four of these and
the holes in here I could put the ends
of the extension cord through it and
then I have tools top and bottom I can
hang it up on my ceiling up and out of
the way so it's a nice little compact
convenient extension cord holder easy to
make easy to use you can swivel them out
of the way get the cords right off to
seconds and it seems to work really well
so I'll put some dimensions up if you
want to build yourself but really
whatever works for you whatever sides
anything you want to store up on the
wall they're flat on the back
again not like a traditional rap where
you have have to make a handle or
something these are nice and flat you
can store them on the wall up and out of
the way so hope you like them Thanks
you well I hope you liked the video you just
watched if you did feel free to
subscribe by clicking the button on this
side you can also check out all the
videos I've done the playlist from
things I've built things I've fixed home
repair 3d printing and on this side you
can check out a recommended video
similar to the one you just watched
and as always down in the description
I'll put a link to my blog which has
more pictures and more information about
the video you just watched thanks
Subscribe to:
Comments (Atom)


