I own a small plastic 9" delta bandsaw. It has always been poor at cutting a straight line and forget about resawing.
Then i saw a video by Alex Snodgrass and decided to give the saw adjustments another try.
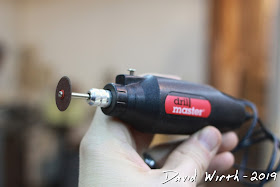
First thing was to sharpen the blade. I bought a cheap $9 rotary tool from Harbor Freight, and used the carbide disc to sharpen all of the teeth on the blade.
I feel like this made a huge difference, less cutting pressure was needed.
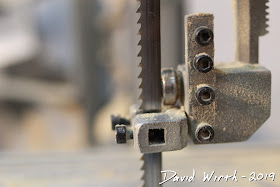
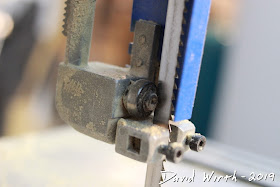
The next thing was to adjust the upper and lower blade guides. They should be close but not touching.
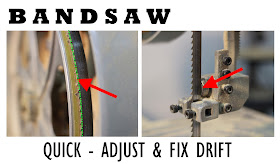
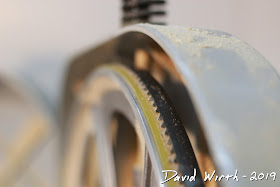
The second big difference was the picture below. The blade doesn't need to be centered on the wheel...the gullet of the teeth need to be at the center and supported.
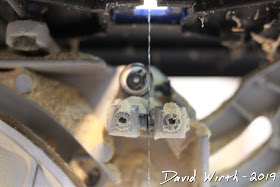
Another view of the upper blade guides.
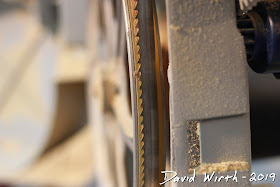
The lower wheel doesn't matter. The blade just needs to be somewhere in the center.
And again with the lower blade guides. Guides and bearing need to be close but not touching.
Video Transcript:
for years I had issues with this little
Delta bad side never cut while I was
always struggling with the cuts and I
recently got it set up so it cuts
perfectly on so let me show you how I
set it up and the things I learned most
were from YouTube by a guy named Alex
Snodgrass it's probably one of the
suggested videos over here it's 35
minutes long I suggest you watch it but
here are the quick things that I learned
and how I got this set up so before you
do anything make sure it's unplugged so
you can work on it without fear of
hitting the switch there's just a few
things you have to setup but the biggest
thing the number one thing I learned was
the blade on the wheel I was getting
lots of drift it was always drifting off
line when I was trying to resaw cuts and
the biggest thing I learned from that
video was you you Ness not necessarily
want the blade in the center of the
wheel you want the gullet of the teeth
in the center of the wheel and his point
was just because the blades in the
center of the wheel the teeth might be
unsupported and that's why you're
getting drift on the blade so the setup
I have now is the gullet of the teeth so
where the teeth come to the point and
then curl around that deep the deepest
part of that curl should be in the
center of the wheel I think that made
the biggest difference so right here
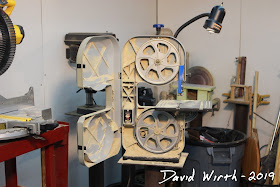
this is the top wheel and you can see
that that blade is not centered but the
gullet of the center the teeth are
centered on the blade I used to have
this blade shift that over way over to
the left and now it's supported the
teeth are supported and it cuts much
better and you can see on the bottom
that's totally different the teeth are
off the front so I was always concerned
about getting these two coplanar and
getting them aligned he said as long as
the on the top wheel the teeth the
gullet of the teeth are centered on that
wheel that's all you need and that has
made the biggest difference the next
thing I did was sharpen the blade I've
been using an old dull blade so I went
through I got a little the nine dollar
sharpener from Harbor Freight and I just
went through and touched the blade
sharpen it up I think that made a big
difference next the adjustments
and this saw has the little allen wrench
right there on the side you can remove
this blade yard now the adjustments on
the set the two side adjustments
typically there's a type of friction
material or a little two bearings this
has the little friction blocks on the
side they want to be just not touching
maybe a sixteenth of an inch they're
just there in case the blade gets off
track so not a huge amount of adjustment
on the top or bottom of the side
adjustment adjusters that's not very
critical on the back there's a wheel
bearing on the back of the blade that he
said take take a lot of time adjusting
that it shouldn't be touching it should
be as close as you can get it without
touching so you don't need an eighth of
an inch sixteenth of an inch as close as
you can get that back wheel without
touching that's where you set it on the
top and the bottom so here are the
guides and I've tried to get this as
close as I can without touching the
blade this back guide and on the front
these don't have to be exact just as
close to supporting the blade as you can
and the last thing he said was
tensioning of the blade no some people
say oh you should pluck it and hear a
note should be this note it should be
that note his suggestion was just tap it
with your finger on the side and it
should deflect an eighth of an inch so
it doesn't matter how big your saw blade
is what type of blade it is then we'll
just tap it on the side thanks about
here you just tap it real lightly and it
should deflect an eighth of an inch and
that's how you get the tension and
here's what he meant when he said
adjusting you're just tapping the side
of the blade and it should deflect an
eighth of an inch it doesn't matter what
size blade you have what's I saw you
have just tap it on the side and it
should deflect an eighth of an inch
so those things sharpening the blade
centering the the gullet on the wheel
the adjusters on the blade guides
and the tension this is I was cutting it
better than it ever has and I think the
main thing though that I learned was
getting that the blade centered getting
the gullet centered and critically on
the top you're not concerned about the
bottom really you don't care about the
bottom it doesn't have they don't have
to be coplanar they don't have to be
aligned as long as you are centered on
the gullet on the top so it's actually
off the the teeth are a little bit off
the wheel on the bottom so it's cutting
great because I'm a top here it's in the
center the teeth are supported and
they're not flexing offline so those are
the things I learned after you watch
this video I suggest watching his video
over here on the left it's 35 minutes
but it's super good and he tells you
tons of ton of stuff about bandsaw and
cutting but I hope this helped I hope
this was a quick lesson on getting rid
of drift and getting it cuts on a
bandsaw even a cheap bone like this

No comments:
Post a Comment