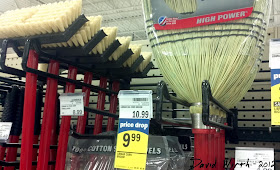
When i first bought the house i did put some nails in the wall but they really didn't work that well. So i looked at a bunch of different designs online for tool racks. There were some fancy expensive ones that had individual clips for each tool. But i figured that when it's the middle of winter and i just got done shoveling the snow i would just end up throwing the shovel against the wall, rather then finding the particular hook that went for that shovel. I decided to go for something simpler. So i went to Meijer and looked at the hooks and brackets that they sold. They have me a ton of ideas.
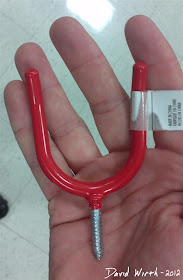
I was thinking of making some simple U-shaped brackets like this for things like brooms and shovels. Then make L-shaped hooks for tools with handles.
But then i got my best idea from their Lawn & Garden aisle. Instead of having just 1 hook for 1 tool, i could stack multiple tools on top of each other.
I was originally going to attach a 1"x4" piece of pine to the wall then use wood dowels as the hooks/runners. But when i got downstairs i realized that i didn't have any wood dowels. What i did have was metal conduit and lots of PVC pipe. I thought the PVC would work great as long as i could glue it well enough to the wood and that it didn't snap off in the winter with lots of weight on it.
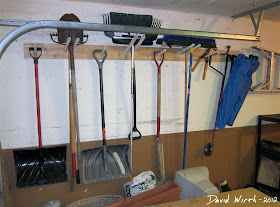
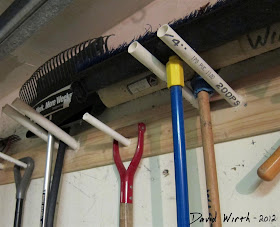
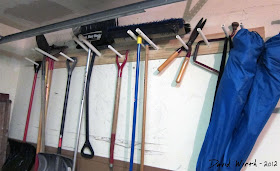
So i decided on 3"4" PVC pipe then marked out layout that i wanted. I kept it mostly symmetrical, alternating a single hook with a double runner. I didn't take any pictures during the build process, so here it is after i attached it to the wall.
The glue i used actually didn't work, it wasn't strong enough and the PVC pipe sagged with any weight. So i drilled a small hole at a downward angle through the back of the board into the pipe. The cool part is that you cant see it from the front.
Also i used a stud-finder to locate the 2x4's behind the drywall in the garage. Then i marked and drilled holes every 16". A couple of the screws missed the studs so i had to redrill them, but eventually it was attached to the wall.
I like how it turned out. Everything is up and out of the way. Also it's easy to see everything. Much better then a big pile of rakes and shovels on the ground.

.jpg)
Good job. I did something similar in my basement. Only I put a board vertically on the wall with two wooden arms coming out and braced. Kind of like the pictures you showed at the hardware store.
ReplyDeleteYa it's been about a year and the PVC is holding up fine. But if i had to do it over again i probably would have gone with an angled piece of wood, which would be stronger.
ReplyDelete-Dave
I think the pvc was a good choice, though. I also made a similar shelf in my basement as the one you constructed. You seem pretty creative. Keep it up.
ReplyDeleteGreat job! I'd be concerned about taking a core sample of my head if I fell into the pvc. Maybe some caps would be a good idea?
ReplyDeleteAlternately, some large wooden dowels installed the same way, or for the heavy duty application: iron pipe?
Keep up the great work!
--Tom
The PVC is about 7' off the ground, so no worries about banging into it.
ReplyDeleteAnd about the choice of materials... iron pipe would be too expensive and overkill for shovels and rakes. I did originally think of wood, either dowels or 2x4's. But so far the PVC has been great. And in the winter i'm not worried about it snapping when it's below zero.
I'm confused how drilling a small hole hole through the back of the wood into the pipe kept the PVC from sagging?
ReplyDeleteBrandy,
ReplyDeleteWell i originally thought that if i glued the pvc to the wood at something like a 15 degree up angle, that it would hold. It didn't. The glue didn't stick the pvc to the wood really well.
So i drilled a hole from the back side of the board, through the wood and into the pvc. I tried to make it so it couldn't be seen, right where the pvc goes into the wood. Then i used like a 2" screw. It sort of made a triangle between the screw, wood and pvc. That's what really prevents the pvc from just sagging. Had the glue been stronger i wouldn't have needed the extra screw.
Not really sure that i did a good job explaining it. But hope it helps.
Dave
First of all Dave - I like your creativity and willingness to share. I was stunned when I saw your pictures of the tool rack/organizer - it looks allot like mine (same sized board anchored to the wall - height and everything - similar number of tools), but yours looks so much better organized and would hold more tools! I just used long nails, and I am not happy with them.
ReplyDeleteAfter seeing your PVC idea I now want to yank my nails out and go with your idea.
** How did you drill all the holes for the PVC pipe at a consistent angle? (I hope you don't say with a drill press because I do not have one)
Again - GREAT JOB
-Craig
Well ya i did use a drill press. You don't need to use a drill press, it's just a lot easier to keep that consistent angle. If you drill your first hole you can eyeball that same angle every time, or cut a wood block at an angle and have your bit ride against that.
ReplyDeleteBut if i had to do it all over again i wouldn't use PVC. They are not super strong and the way i attached them to the board wasn't great either.
If i did it again i would use wood or metal for the "arms". If i were to use wood i would go with dowels or maybe just 2x2's that were glued and screwed in from behind. Metal would be nice and durable although it might be more expensive and i'm not sure where i would get the large brackets. Even if you just got pipe and bent it, that would be costly too.
Dave. Thanks for the ideas. I've already started pricing the wood for the shelving you built. I'm putting one in my garage and probably a couple at my in laws. Only difference is I am going to attach mine to the wall with 90 degree brackets. Best shelves I've seen so far! I am in South Africa and we use metric measurements so my biggest challenge was doing all the conversions, but got that sorted now.
ReplyDeleteQuick question on the garden tool rack.
You said next time you'd rather use wood instead of pvc. I guess you mean you would still angle the wood "pegs" rather than at. 90 degree angle to the wall. Also, I guess wood glue and screws would be a better combo with the strip of wood that's attached to the wall.
Warm southern hemisphere greetings!
Hennie van der Watt
To Hennie van der Watt:
ReplyDeleteYou are absolutely right. I should have made the "pegs" out of wood, they would have been a lot stronger and i could have attached them using wood glue and screws. Trying to combine PVC and wood wasn't a good idea.
As far as angling them up a little, ya i would still do that. Not too much, maybe like 95 or 100 degrees. I don't think it makes that much of a difference, it's not like the shovels and rakes would be falling off it were at 90 degrees.
Hey so i saw your blog and this is awesome and similar to what i want to do at work for audio cabling! I'm going to be building this with steel pipe (left over from previous gig) for the "arms". Im just thinking how to attach them to the wood to make sure they dont fall out and stuff. My thought is drill a whole for the pipe at an angle and from the back drill through the wood and the pipe and put a skrew or something in. im just not sure how to do it without the pipe damaging the wall behind. thoughts?
ReplyDeleteWhy not use a 2 by 4.. Drill the hole almost all the way through making sure the PVC fits tightly then from the top of the 2 by 4 put in a screw to hold the PVC in the hole
ReplyDeleteHow long are the PVC "pegs" - or how far out do they protrude from the board?
ReplyDeleteThe PVC pipes vary in length, from 8" for the small ones to 12" for the larger ones.
ReplyDeleteDave,
ReplyDeleteI liked your garden tool rack idea and the constructive/previous comments. So, about a year ago I decided to make one…and take it to the next level.
Using a scrap piece of 2”x6”x5½’ lumber, I mounted twelve 7/16” diameter wood dowels cut to 9” length, in pairs 4” spacing, each pair being 11” apart center-to-center. So there are 6 pairs of dowels across the face of the board. Each dowel is mounted approx. 10° up from horizontal so the tools don’t fall off. The 9” length allows for two or more tools to hang on each pair of dowels. I wanted the dowels to be removable so I could alter the length if needed. However, I have found both length and diameter to be sturdy and adequate.
I made a simple jig for my drill press so all holes would be the same angle and depth. This could be done using a power drill, but a drill press certainly makes life easier.
I sanded then stained all wood using left-over Minwax penetrating cherry stain; then coated all with 1 coat of (also left-over) Minwax clear, semi-gloss, marine urethane.
This is a stunning, very functional, tool rack. It looks like a piece of expensive furniture to mount in your living room and be proud! I invested about $12 in materials (dowels). Everything else I had laying around the house.
The rack is mounted to a wall using 3 lag bolts/washers, at studs 16” on center, 7’ 3” above the floor (in a room with 10’ ceiling).
I took a couple of photos I could send to you…welcome to use them…don’t think I can post photos here on your blog?
I like your garden tool rack idea and the various comments. So, about a year ago I decided to make one…and take it to the next level.
ReplyDeleteUsing a scrap piece of 2”x6”x5½’ lumber, I mounted 7/16” diameter wood dowels cut to 9” length, in pairs 4” spacing, each pair being 11” apart center-to-center. There are 6 pairs of dowels across the face of the board. Each dowel is mounted approximately 10° up from horizontal so the tools don’t fall off. The 9” length allows for two or more tools to hang on each pair of dowels. The dowels are not glued, they fit firmly in the holes. I wanted the dowels to be removable so I could alter the length later if needed. However, I have found both length and diameter to be adequate & sturdy.
I made a simple jig for my drill press so all holes would be the same angle and depth. This could be done using a power drill, but a drill press certainly makes life easier.
I stained all parts using left-over Minwax penetrating cherry stain; then coated all with 1 coat of (also left-over) Minwax clear, semi-gloss, marine urethane.
This is a stunning, very functional, tool rack. It looks like a piece of expensive furniture that you should mount in your living room and be proud. :) I invested about $12 in materials (dowels). Everything else I had laying around the house.
The rack is mounted to a wall using 3 lag bolts/washers, at studs 16” on center, 7’ 3” above the floor (in a room with 10’ ceiling).
I took a couple of photos I could send to you which you are welcome to use. However, I think I cannot post photos here on your blog.